I decided to hand nail the long side of the floor. I blind-nailed it (nailing into the tongue of each board, at an angle, then setting the nail to lie flush with the tongue) and it looks really quite nice. I don't usually say this - I usually cheer everybody on to try stuff - but you can't do this if you don't nail well. If you bend a lot of nails or hit your thumb or miss a lot, this is not the technique for you. But if you can nail decently, it's not bad!
I face-nailed (nails on top of the boards, where you can see them) the first row of boards, then started blind-nailing. The last row is face-nailed too. I predrilled a hole for every single nail, which makes all the difference in the world with oak. The first row I blind nailed I fucked up a lot, but once I got the hang of it I rarely wrecked a nail or banged the wood. I used 6f's (6 penny finishing nails), because they're what I could get locally - the Internet says you should use cut nails, kind of like delicate small concrete nails, but local stores don't carry them. I know that finishing nails could pull up at some point in the future, so I angled the nails in slightly different directions, for better hold.
I spent about six hours working on the floor, and got the long side of the hall and the coat closet done.
I keep thinking maybe I should've used 8's instead of 6's (8s are 2 1/2" long, 6's are 2" long), but it's such a disaster if a nail bends while you're driving it. Really hard to pull it without denting the board. And 8's bend so much easier than 6's... I think it'll be ok.
I have some pictures and video, but I'm too tired to care about uploading them tonight :) I love the way the floor looks and feels. It's very tight, no bounce or squeak, just that slight softness you get from walking on real wood.
Monday, January 31, 2011
Saturday, January 29, 2011
Jamb it all...
After I posted last night, I realized that yes, I did need to cut the door jambs. So I got up this morning, went to my hair appointment (I'm a lovely shade of blonde again), had lunch, dawdled home, checked my email and Facebook and craigslist like 15 times each, then woefully set to work.
I don't have a jamb saw. They're really one-trick ponies - they only cut jambs. They cut the hell out of jambs, but it's an expensive purchase for one home, even if it is The Home of Infinite Doors. My best friend back in Memphis has a jamb saw - I could find it in his toolbox blindfolded. Alas, he is 2000 miles away, so I made do.
I tried my trusty hacksaw, but it didn't work as well as I'd hoped, so I turned to the coping saw. It worked well enough, so I spent three freakin' hours cutting 18 door jambs. I got pretty disgusted a couple times and almost went to town for a Dremel, but I contained myself and got it done.
Now. Back to cutting oak.
Friday, January 28, 2011
Floor halfway laid!
I'm learning a lot. I must admit - I understand how floors work, and I've done some repairs and some click-together laminate, but I've never installed hardwood. Still, it's going exactly like I thought it would - it's easy yet tedious. Today I worked really hard, yet really inefficiently, and got almost half the hall cut to fit in place. I flopped down three rows, then double-checked the Internet Consensus. Cussed a lot. Pulled them up and flipped them around so that the tongues go out toward the part you're working on. Laid them back down. Wondered how much expansion joint to leave - looked that up (3/4" is "standard" or possibly "total overkill for a hall" - it's pretty small sq. footage, so it just can't expand like a huge room can. Cussed a lot. Banged my three rows out from the wall, wedged in some scraps of baseboard, kept cutting and dry-laying.
My hall is an L-shape - 17' x 3', then a 90 degree turn, then another 17'x3.' For reasons too tedious to type out, I picked one leg of the hall to be the "long" side, with the boards running the length of the hall. The other leg is the "short" side, with the boards running side to side. When I got the "long" part of the hall down, I realized I'd be much better off using a 3/4" joint instead of the half-inch baseboard - if I use a half-inch joint on one side, I have like an inch on the other side. Using 3/4" on both sides makes the floor come out even without ripping down 17' of flooring planks - and it always looks nicer if you can avoid splitting boards. So I whipped out the prybar and scooted the whole mess over.
I laid about 3' down the short side of the hall, then reached a doorway. I didn't want to cut to fit around the doorway until I was SURE of where the boards will be, so I thought I'd topnail the first row of boards on the long side. I'm not nailing anything until I get the whole floor mostly cut and fit, since I'm renting the nailer - I'm just too slow at this to justify spending days with a rented nailer. Anyway, I headed back up to topnail the first row and realized I really ought to lay in the doorways on the long side - the trim will cover the 3/4" gap along the walls, but I need a half-plank or so in each doorway to cover the threshold. As I feared, my little homeowner grade circular saw doesn't precisely enjoy ripping 3/4" oak, but it did the job. To get the thresholds wedged in, d'oh, I needed to scoot the whole floor up against the far wall. The prybar did the trick, but I was pretty frustrated at that point - why didn't I do the damn doorways first?
Anyway. Got the doorways in. The floorboards are pretty tight against the door jambs - I wonder if I should hacksaw the door jambs off to float just above the planks, in case of expansion? The house gets (relatively) humid in the summer from the swamp cooler - but does hardwood expand along the length a lot, or just along the width?? The internet is inconclusive, and it's something I can do later on.
I drilled and nailed the doorways and the first long run with finish nails. They're pretty unobtrusive, and the trim should almost cover them. Then. Finally! I tapped all the boards back tight and flush with the nailed-down first row, slapped up some boards in the coat closet, and called it a night.
Ta da! One closet, four doorways.

I had to take the door down to the furnace nook. It needs trimming. I hope the cats don't kill themselves or burn down the house in the furnace tonight.
Astute readers are wondering how the hell I'm going to nail the floor after it's laid. I have a complicated scheme to pull it back up and carefully stack it in the right order. I think it will work, but complicated schemes often fail. We'll see... this might end up being cheaper but much more tedious than just renting the damn nailer for two days.
I didn't use the tape measure once. If you want still more words about this, I will explain how to flip boards around to mark where to cut without measuring.
My hall is an L-shape - 17' x 3', then a 90 degree turn, then another 17'x3.' For reasons too tedious to type out, I picked one leg of the hall to be the "long" side, with the boards running the length of the hall. The other leg is the "short" side, with the boards running side to side. When I got the "long" part of the hall down, I realized I'd be much better off using a 3/4" joint instead of the half-inch baseboard - if I use a half-inch joint on one side, I have like an inch on the other side. Using 3/4" on both sides makes the floor come out even without ripping down 17' of flooring planks - and it always looks nicer if you can avoid splitting boards. So I whipped out the prybar and scooted the whole mess over.
I laid about 3' down the short side of the hall, then reached a doorway. I didn't want to cut to fit around the doorway until I was SURE of where the boards will be, so I thought I'd topnail the first row of boards on the long side. I'm not nailing anything until I get the whole floor mostly cut and fit, since I'm renting the nailer - I'm just too slow at this to justify spending days with a rented nailer. Anyway, I headed back up to topnail the first row and realized I really ought to lay in the doorways on the long side - the trim will cover the 3/4" gap along the walls, but I need a half-plank or so in each doorway to cover the threshold. As I feared, my little homeowner grade circular saw doesn't precisely enjoy ripping 3/4" oak, but it did the job. To get the thresholds wedged in, d'oh, I needed to scoot the whole floor up against the far wall. The prybar did the trick, but I was pretty frustrated at that point - why didn't I do the damn doorways first?
Anyway. Got the doorways in. The floorboards are pretty tight against the door jambs - I wonder if I should hacksaw the door jambs off to float just above the planks, in case of expansion? The house gets (relatively) humid in the summer from the swamp cooler - but does hardwood expand along the length a lot, or just along the width?? The internet is inconclusive, and it's something I can do later on.
I drilled and nailed the doorways and the first long run with finish nails. They're pretty unobtrusive, and the trim should almost cover them. Then. Finally! I tapped all the boards back tight and flush with the nailed-down first row, slapped up some boards in the coat closet, and called it a night.
Ta da! One closet, four doorways.
I had to take the door down to the furnace nook. It needs trimming. I hope the cats don't kill themselves or burn down the house in the furnace tonight.
Astute readers are wondering how the hell I'm going to nail the floor after it's laid. I have a complicated scheme to pull it back up and carefully stack it in the right order. I think it will work, but complicated schemes often fail. We'll see... this might end up being cheaper but much more tedious than just renting the damn nailer for two days.
I didn't use the tape measure once. If you want still more words about this, I will explain how to flip boards around to mark where to cut without measuring.
Thursday, January 27, 2011
Prep is always the most important step
I moved briskly along to the hall floor today. I needed to level it and put 15 lb felt paper down - after that, I can dry-lay the floor over the weekend, then rent the nailer Monday and hopefully get it done in a day.
Here's what I learned: the cheap laminate was failing because of the wonky dips in the subfloor. I'd seen one of the ridges as soon as I took up the laminate, and I've been worrying about it every time I walk down the hall for two weeks. The ridge I was looking at was a weird little hump where the hall runs into the front room, by the coat closet. I used the old beadboard to shim up the closet floor and part of the hall floor, then evened everything out with layers and layers and layers of felt paper. But that ridge turned out to be the easy one! There was another high spot in the center of the hall, headed toward the laundry room. The sides of the hall were EACH 1/4" below the middle of it for a good 5' before it evened back out.
I have been deliberately clunking down the hall and bouncing up and down on the subfloor, and nothing squeaks or bounces. That's good - it means the floor joists underneath are in good shape (just like the home inspector promised. Of course it's fine - everything that got inspected is fine, everything that isn't on a standard home inspection is wrong, fucked up, broken, or unsafe.) Now - if the floor joists are fine, what gives with the subfloor?
It's probably just age. Things warp and sag and settle into new slightly off kilter configurations from about the time the first owner moves into the house. I could shim it up and make a flat surface to nail the flooring to, or I could climb under the house and put in some bridges between the joists and jack the bridges up perfectly level and probably level the floor from below. If the joists were creaky, I would go under there and do some work. But as it is - if I go mucking around bridging the joists and jacking them up, I could cause other immediate problems, like shifting the whole house so that the doors don't shut right or the drywall cracks. I am already putting the hardwood down because I tried to fix something and made it worse, so... I just shimmed the subfloor from the top.
I filled in the big spots with the old paneling from the front room. I hadn't gotten around to sawing it into small enough pieces to hide in my trash bin, and I'm glad. (Remodeling really brings out one's hoarder tendencies. You really can reuse that junk!) The old paneling that I took down was plywood and slightly thicker, and the leftover pieces of new paneling were MDF (or maybe HDF) and slightly thinner. Here's what I did.
I got three straight level-things ready - my 24" spirit level, a piece of the hardwood flooring exactly the width of the hall, and a 6' piece of aluminum I found in the garage. (I think it was part of the closet doors we took down. See, I did need it for something!) The long piece checked the flatness of the subfloor lengthwise down the hall, the short hardwood laid on its side checked it side-to-side, and just for laughs I checked the actual level every so often.
I started at the end that was bugging me.

See how the level is sitting on the paneling in the closet, the hump in the floor, and the paneling on the floor at the right? Whole day went like that. I filled in the low spots with paneling, then layers and layers of felt paper to smooth out the transition from the paneling to the subfloor. Crawl 2 feet away, check flatness from both directions, repeat. I used five strips of staples and about 250 sq ft of felt paper (for 100 sq ft of hall!)
The cats were nuts about this crazy thing happening before their eyes. And Cersei was a little nervous, but not too bad. The main casualty was me - my back is in knots, and I'm sure my knees are bruised.
Wednesday, January 26, 2011
Finished the front room!
I took a short video in the hopes that you can see the colors and layout better that way.
Now, even though I just said it's finished, here's what's not finished: some of the switch plate covers are fancy wood guys, so I'm priming and painting them. I haven't put up the crown molding, and the ceiling could use a second coat of paint before I do. And the front door is the "original" white, not the white I'm using - but it needs some drips sanded off. I'll do that when it's warmer and I can leave the door open while it dries, maybe replace the weatherstripping at the same time.
I took a lot of pics as I worked, so I'll write up something on molding and something on painting next.
Next project: install the hardwood in the hall. I'm going to lay the underlayment and get it dry-fitted over the weekend, then rent the nailer Monday.
Finished front room from Funder on Vimeo.
Now, even though I just said it's finished, here's what's not finished: some of the switch plate covers are fancy wood guys, so I'm priming and painting them. I haven't put up the crown molding, and the ceiling could use a second coat of paint before I do. And the front door is the "original" white, not the white I'm using - but it needs some drips sanded off. I'll do that when it's warmer and I can leave the door open while it dries, maybe replace the weatherstripping at the same time.
I took a lot of pics as I worked, so I'll write up something on molding and something on painting next.
Next project: install the hardwood in the hall. I'm going to lay the underlayment and get it dry-fitted over the weekend, then rent the nailer Monday.
Thursday, January 20, 2011
More progress
Got some of the trim up in the front room today. It looks way better.
First I wanted to change out the blade on my miter saw. I love my saw - picked it up for $50 off of Craigslist. It's not a compound one, just a standard Ridgid miter saw. I forgot a crucial saw changing rule, which is that saw screws are counter-threaded - left is NOT loose. No matter how much WD-40 you put on, and how much torque you put on the wrench, left just won't loosen the nut. A frustrated Google solved that problem, and righty loosey got that nut right off. The new blade cuts that oak trim like butter. <3 a new blade.
Yesterday I'd worked out in my head the order I needed to do stuff in. It was a little backwards from normal new construction trim, but it was logical. First, door trim around the entrance to the kitchen. Put up the sides by measuring the short (inside) point, level them, then you can measure long-to-long for the top piece - it's much easier to measure and cut long-to-long than short to short.
Next, I put up the chair rail on the long wall. It's about 17', but there was just no way I could get a 17' piece of trim home, so I bought two shorter pieces. I cut the 11' piece of chair rail straight on one side (where it roughly butts up to the stone wall), and angled on the other side. Then, since I had the door trim up, I could just cut an angle on the second piece and hold it up to mark the flat cut against the door trim. It's always preferable to hold something up and get the mark that way, if you can - measuring properly then marking properly is hard for everybody.
Then I cut the two short pieces of chair rail for the walls beside the hall entrance. I cut them to length at a 90 degree angle, then set the blade at at 22 angle and nipped off just a tiny bit - it looks better than a flat cut or a 45 terminating at that outside corner. I've got some pictures of it, and I'll edit them in so you can see what I mean.
The two short pieces of chair rail needed to line up with where the old trim had been - that way the line of the chair rail all around the room will be at the same height. Once I had those pieces in place, I just laid in the 1" flat trim that goes vertically along the outside corners. Once I had THAT in, I could measure the remaining holes and cut the new wainscoting.
It's one of those (frequent) times when I wish I had a table saw. It's really hard to cut a perfectly straight line on a 4' wide piece of material with a circular saw! I flipped each piece around so that the factory edges are at the top and out sides, and the jaggedy Funder-cuts are at the bottom and in the corners. The baseboard will hide the bottoms, and a little caulk fixed the corners right up.
I chipped off one corner of one piece, but I got it glued back down. When the glue sets, I'll carefully caulk it and I think it'll look ok - it's near a corner. I also glued the join on the 17' wall, with my snazzy Gorilla Glue. There's a small seam visible, but again, I think caulk will fix it.
I got a lot of the trim caulked and most of the nails filled. The new wainscoting is glued to the walls, then held on with paneling nails I scavenged off of the old wainscoting. Paneling nails have little rings down their length, to hold better. They're just another minor expense that I thought I could avoid, and I'm glad I did. I only needed about 20 nails.
The nails on the rest of the wainscoting aren't set, they're just flush with the wall, so I left the new pieces that way too. I might set them anyway... I won't decide til I get one coat of paint on. I don't think you're supposed to set paneling nails?
Tomorrow mid-day I'm going riding with a friend, but I need to paint some more when I get back. I'll do a little more detail on trim work then too. I've got a post on painting tips mostly ready to go. It's surprisingly hard for me to write generic tips posts! They don't flow right, not like describing stuff I've done. And I constantly wrestle with not wanting to put up a huge post where you'll get bored halfway through, so I know I'm skipping over stuff here. As always, holler if you want more detail on something.
Wednesday, January 19, 2011
Slow progress
I am progressing, actually.
The hall is on hold while the wood acclimates. I got the long wall of wainscoting primed and one coat of trim paint on it. I took down two hall doors, primed them, and got a coat of trim paint on them too. Tomorrow I'll second coat all that stuff, then I can re-hang the doors and see how they wear. I actually really like the way they look painted, so I hope they don't chip and look shitty :(
I took down the two small piece of wainscoting. Yep, they were nailed AND glued to the wall, so it's really spectacularly ugly right now - bits of Liquid Nails, s-shaped rips in the pink sheetrock, different texture... ugh. Today I've been thinking about how to deal with some trim issues.
I am not sure if this is good descriptive writing. One of the reasons there are so many "secrets" to home improvement is that it's amazingly hard to describe a problem or a solution without pictures, and before camera phones that was just not feasible. I've taken some pictures, and I can take more or just try to clarify what I'm talking about. So if reading this makes you go "huh?", let me know!
I'm gonna use this term a lot, so I'm gonna take the time to explain it. There's two kinds of corners in a room - inside and outside. Inside corners are the four corners of your standard box-shaped room. Outside corners, counterintuitively, poke IN to a room. If you have a doorway that doesn't have a door in it - just a drywalled opening - then those are outside corners.
First, the wainscoting terminates at each doorway. I am going to trim the doorway to the kitchen, because it'll look ok with trim and it's much, much simpler that way. But the "doorway" to the hall is actually just an opening that goes to the ceiling. Since matching the fake stucco drywall texture is off the table, (glares at jenj) I want to put up replacement wainscoting. The previous stuff was "framed" with reversed door trim, which meant the plywood edge of the wainscoting didn't show where it ends at the outside corner to the hall. I am using chair rail for the top line and baseboard for the bottom line of the wainscoting, but I needed something to cover those outside corners to the hall. I poked around Home Depot and decided that a piece of flat 1" trim won't look too bad - it's got one sharp edge, which I will butt up against the new wainscoting, and one slightly rounded edge, which will line up with the outside corners.
This is the reason why I had to buy a sheet of new wainscoting, by the way. The new trim is narrower than the door trim, and the current wainscoting wouldn't cover.
My second problem is much more daunting (but easier to ignore!) If you've never seen it installed right, or looked closely at crown molding, you might not realize that it sits at a 45 degree angle between the wall and ceiling. It actually touches both the wall and the ceiling - there's a triangular gap behind the piece of molding you see up there. The idiot previous owners "trimmed" the walls with door trim attached to the walls, touching the ceiling. It didn't make that 45 degree bend and attach to the ceiling too. (Well, it couldn't - real crown is beveled on the backside to fit snugly against the wall and ceiling at the same time.) I pulled that crap down, so there's a 2.5" wide pink band around the top of the whole room. Miraculously, the "stucco" goes all the way up to the ceiling, but it's all chipped and there's cracks at the ceiling line and it looks gross. And it's a big room, so it would actually look quite nice with crown molding.
Here's the problem: I have to figure out how to terminate the crown at an outside corner. Remember how I said there's a triangular gap behind each piece of proper crown? I've got to cover that up! It's pretty easy to terminate to an inside corner - Home Depot even has little decorative bits to make it look snazzy - but not so easy to terminate an outside corner. I don't want to run crown down the whole hall; I don't think it would look very good and that stuff's not cheap. If I don't figure it out before I get to the crown, I will probably run it along two walls and leave it for later.
I've found some decent tutorials for how to terminate the crown there. It may be beyond my capabilities, but they're short runs so it's worth trying.
Saturday, January 15, 2011
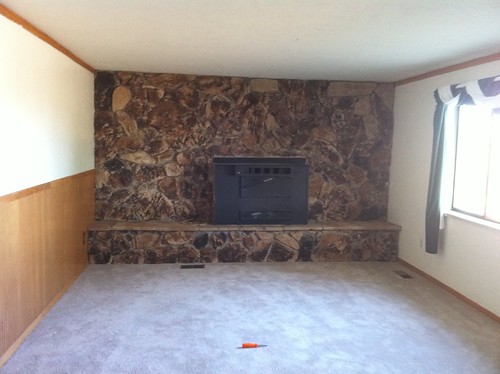
Colors
After a really frustrating morning googling for 70s fieldstone walls that don't look hideous, I think we're leaning towards yellow.

I cropped the right side of the room because the enormous blue recliner stands out so much it's hard to judge the other room elements. The curtains are chocolate and off-white - if the yellow doesn't clash with them, they will be a great accent for the giant stone wall.
I need to pick up a lot of light and medium yellow swatches and try them out.
The enormous blue recliner will either live in a spare room or make its debut on craigslist.
Any suggestions?
Friday, January 14, 2011
Cheap hardwood
So I fucked up the hall. The best way I've found to deal with fucking something up is to sulk for no more than three days, then move along. I hated that floor anyway, so we've decided to replace it. With hardwood. Cheap hardwood. The good stuff starts at $5/sq ft, and sure it looks really nice, but it's a hall. I was not thrilled about the thought of spending more than $500 to have a floor in the hall.
I did a lot of looking online and in town, and I found medium brown utility grade 3" wide solid oak for under $2/sq ft. It's a shade darker than I would have chosen in a perfect lottery-winner world, but I actually really like the utility grade stuff. Utility/cabin grade means it's got knots, wormholes, and occasional damage to the structural tongue-and-groove parts. You buy a little extra to make sure you have enough. The floor doesn't look mirror-smooth and perfect when it's finished, but that's not really appealing to me anyway. It's a hall. The dog is going to track in sand, I'm only going to sweep once a day, and honestly? I'm not going to remember to take my shoes off every single time I come through there either. It's gonna get banged up. Pre-banged-up is just fine with me.
I picked up five boxes (105 sq ft) today, but I think I'm going to go back for another box tomorrow or Monday. The actual hall dimension is 90 sq ft, so 105 is perfect - but, er, there's two tiny closets I forgot about. And the previous owners forgot about - the original 30 yo extremely horrible blue carpet is still in place in them. If I buy one more box of wood, I'll have plenty to do the closets too.

Advice online says to let your wood acclimate to your house's temperature and humidity for a week. The guy at the flooring store recommended 2-3 weeks - eeek! I'm sure he's right, as much as I hate to wait now that I have exciting new flooring. There's like no humidity at all in Reno, so the wood will shrink as it loses moisture. I'd really, really hate to lay the floor, nail it down, then have it shrink up and get big cracks in it. So I'll wait.
I locked the cats in the bedroom while I pulled up the laminate and stacked the boxes of hardwood in the hall. When I let them out, it was a Brave New World, one which they'd never seen before in their whole lives.
Advice column
I received a letter!
Dear Fugly to Fabulous,
I need some advice on finishing door frame trim. We had to shim our
door frame when we put it back in - you see, we ripped out our
bathroom to the studs and when we re-hung the drywall, we discovered
that most everything was off by 1/2 inch - since studs from 1951 are
actually 2 inches by 4 inches, and not 1.5 x 3.5 inches. So, we
shimmed the door frame, but now that we're to the finishing stage, I'm
realizing that we're going to have to take drastic measures if we want
the shimmed piece to look nice and smooth along with the rest of the
frame.

We've tried caulking, which helped some, but the wood is so rough and
it's not EXACTLY even everywhere with the rest of the frame. Should I
plane it down and then use wood filler to make a smooth seam?

Any suggestions would be helpful. I would prefer to do minimal sanding
since the original frame (on the left in these pictures) most likely
has lead-based paint on it.
Yours truly,
Shimmed in Austin
Hey Austin, do you want props or would you like to remain anonymous?
Ok, I see three different ways of dealing with this problem.
One, caulk it real good and insist to all visitors that it adds character and charm. It'll still be there. You can't hide it with caulk, as you've found out. The problem with this solution is that it's pretty ugly.
Two, like you thought, plane it down and fill it with really good wood filler. I am not a connoisseur of wood filler products, but something like Dap Plastic Wood or Minwax High Performance would probably dry hard enough. But here's the problem with wood filler: it doesn't expand and contract like wood does. Places like Austin have significant humidity changes throughout the year, and the wood filler will probably break at some point.
Three, take the whole door jamb off and replace that piece. Here's how I'd do it:
Pull the trim again, on both sides of the doorway. Measure (at several points) the width of the old jamb + shimming. Get out your Sawzall and cut the nails holding the jamb to the wall - that's the fastest and by far the easiest way to get the casing out. Put in new jambs - it might be a weird size, in which case you'll need to rip down a larger board. Do you have a table saw? It's probably a good excuse to get one, but they are pretty dangerous, so get a book too. Or just clamp a 1x6 to your saw table and carefully, slowly rip it down (with a new blade!) with your trusty circular saw. Then it'll be easy to nail the new jamb and door stop pieces back in. You might as well get rid of the old door stop trim if it's got lead paint on it. Prime, caulk, paint.
Sorry I don't have a magical easy solution to this one. :( Ahh, the joys of homeownership!
Wednesday, January 12, 2011
Argh
I got real quiet here because I appear to have fucked up. I can't get the stupid cheap fragile delicate laminate back in. I pulled up about 7 pieces (broke some of them) to get to the two really chipped pieces. Now I can't get the damn stuff to line back up. It's horrible. I feel like an epic DIY failure.
However! The most boring blogs are the ones where projects magically happen without mishap, where horses never buck or bolt, where children are always well-behaved and get straight A's. And there's always something to be learned from mistakes, either your own or some internet stranger's.
Now that I've confessed my problems I might get it together to write up what I suspect has gone wrong. And real soon now I'll figure out a solution better than "put a throw rug over the subfloor in front of the bedroom door." I'll fill you in on that, too. In the meantime, another maxim to live by: Do not meddle with laminate flooring. It looks fine just like it is.
Friday, January 7, 2011
Front room and hall, part 2
This one has been in draft for like a week, and it's getting incredibly stale. I'm just gonna update it with strikethroughs and then write an update.
I'd like to talk about pacing issues. This is almost instinctual for me, because I have tons of relevant experience, but I think anyone can take the time, think it through, and make some good choices here.
First, what are your parameters?
Do you have to move a lot of furniture? Do you have somewhere to store that furniture? Cramming two rooms' worth of furniture into one room is totally doable, but not a lot of fun - you'll want to finish fast and get things back where they belong.
Where's your workspace? I have an extra bedroom to paint things out of - do you have somewhere to set up a couple sawhorses, a saw, your painting supplies, etc? Maybe you're dependent on weather.
What's your family's collective tolerance for house renovations? If you've got little kids, you'll need to be more careful with your dangerous piles of clutter. Is your SO going to trip over things and get mad and fight with you?
The answers to these questions will help you decide whether you need to go fast or whether you can take your time. Personally, I can take my time - the house is way bigger than our furniture collection, the husband isn't picky, and the cats are underfoot no matter what I'm doing.
Break down the big project into little jobs, then think about how to fit the little jobs together.
Again, I can't explain this properly without an example, so we'll keep talking about the front room and hall project.
I want to:Laminate -
Right now As of last week, I've purchased the sander, some door screws, a mallet, the threshold, and a sheet of beadboard. I know I have enough primer for the trim, the beadboard, and the "repaint" doors. I also picked up some Gorilla Glue, a tiny drill bit, and restocked my finishing nails - we'll get into that in an actual process post, instead of these theory posts I'm doing right now. I dragged the laminate in the house and it's come up to household temperature, so I'm ready to go there.
I'd like to talk about pacing issues. This is almost instinctual for me, because I have tons of relevant experience, but I think anyone can take the time, think it through, and make some good choices here.
First, what are your parameters?
Do you have to move a lot of furniture? Do you have somewhere to store that furniture? Cramming two rooms' worth of furniture into one room is totally doable, but not a lot of fun - you'll want to finish fast and get things back where they belong.
Where's your workspace? I have an extra bedroom to paint things out of - do you have somewhere to set up a couple sawhorses, a saw, your painting supplies, etc? Maybe you're dependent on weather.
What's your family's collective tolerance for house renovations? If you've got little kids, you'll need to be more careful with your dangerous piles of clutter. Is your SO going to trip over things and get mad and fight with you?
The answers to these questions will help you decide whether you need to go fast or whether you can take your time. Personally, I can take my time - the house is way bigger than our furniture collection, the husband isn't picky, and the cats are underfoot no matter what I'm doing.
Break down the big project into little jobs, then think about how to fit the little jobs together.
Again, I can't explain this properly without an example, so we'll keep talking about the front room and hall project.
I want to:
Replace a few pieces of laminate- Replace trim in hall
- Repaint / replace doors in hall
- Remove trim in front room
- Replace beadboard in front room
- Replace trim in front room
- Paint front room
Ok, let's break it down further:
- To replace the laminate, I need to pull the baseboard.
- I need to bring the laminate in from the unheated barn at least 24 hours before I work with it, for temperature equalization.
- I need a rubber mallet and some threshold to finish the laminate job.
Replace trim in hall -
- I'll need to pull the old trim
- Clean up the walls and door jambs
- Paint the walls, while it's easy because there's no trim
- Nail up new door trim
- Nail up new baseboard
- Nail up new quarter round
- Fill nail holes and caulk everything
- Paint the trim twice
- Cut in the walls along the trim line
Etc. for the remaining tasks in the job. I know, this seems like a completely ridiculous level of effort, but once you have in mind exactly what you need to do, it'll be much, much easier to fit the pieces together in different orders.
I started with demolition, because that's the most fun. I pulled all the trim out of both rooms. The existing hall trim is headed for the dump, and the existing front room trim is getting prepped for painting. Tomorrow, I have a lot of options:
I can repair completely wreck the floor
I can finish prepping and priming the beadboard I'm saving
I can remove the beadboard I'm scrapping and apply the new piece
I can figure out which doors I'm keeping and start working on them
I can paint the hall
I can hang crown molding in the front room
Here's what I cannot do:
I can't install the door trim or baseboard in the hall (haven't fixed the floor)
I can't install the new doors (no hole saw yet)
I can't paint the walls of the front room (haven't picked the colors yet)
I can't finish the trim in the front room (don't have the chair rail, haven't applied the beadboard so I can't apply the baseboard)
Front room and hall, part 1
The current project is to paint the front room and finish the hall. I thought I'd walk you through my decision making process. First, here's the status quo.
The front room is horrible. The shiny white walls, wood wainscoting, and fieldstone fireplace conspire to make the room seem long, skinny, and gloomy. This view doesn't look that bad, but if you see it at night or from a different angle, it looks strange.
Plus - this is a personal thing - it bugs the crap out of me that all the trim in the entire room is door casing trim.
It's really saveable, though. It needs either no crown molding or proper crown molding, chair rail above the wainscoting, baseboard below it, and a new paint job. More than likely, the wainscoting will be off-white semi-gloss, same as all the rest of the trim. The walls will be satin, probably two colors - maybe a chocolatey color for the wall opposite the window, and a lighter version for the other walls.
The hall can also be drastically improved on a small budget. I don't like the hall trim.
This stuff is the cheapest possible trim you can install. (Again, a personal thing. G doesn't seem to notice at all, and no visitors have yet gasped "Egads! Your trim is so tacky!")
I'm perfectly happy with builder-grade standard trim. I bought some primed MDF door casing bundles a while back, and I've got baseboard left over from the den project. I also need to repaint - the hall only has one coat on it, and it looks "thin" to my eyes.
I also hate the dark chocolate cheap doors. They're entirely composed of pressboard with some swirls that are supposed to look like woodgrain. One of the doors is broken - it was kicked at some point.
Let's talk about how I narrowed (and expanded) the scope of this particular project.
I first considered working on the hall. I'd need to pull the door and floor trim, put up new trim, caulk it, and paint it. Then I'd need to touch up the walls where I'd caulked the trim. I'd need to pull the doors, one at a time, and paint or replace them. I'd need a space to work on the craigslist doors.
What else can I logically accomplish while I'm doing this? The first thing that came to mind is the floor. The idiots who laid the laminate in the hall didn't bother to cut the bottoms of the door trim - they just hacksawed around where the floor boards butt up to the door trim. And they didn't pull the baseboard - the laminate just comes near the edges of the walls. If that's not bad enough, a couple of pieces are not quite locked in right, and they've started chipping.
The walls just need more paint. The ceilings are blown popcorn, and I painted them in September. That's all the elements of the hall accounted for.
Next - what's my budget? What do I need to purchase to make this happen?
I don't want to spend a lot of money on the floor. We plan to replace the laminate with real hardwood within a couple of years, five at the most. Fortunately, my barn has a couple boxes of extra laminate that the previous owners left for us. All I had to buy was a rubber mallet to tap the pieces in.
Next - the trim. I bought quite a bit of door trim, but I don't think I have enough. Hmm. That's when I considered adding the front room to the project. If I pulled the out-of-place door trim from freakin' everywhere in the front room, I wouldn't have to buy so much for the hall. I probably need a few more pieces of baseboard, and I need several sticks of quarter round to cover up the jagged floor edges. I have enough caulk and I have more than enough paint. If I reuse the door trim from the front room, I'll need a space to sand and prime it. I'll need an orbital sander, though - that's more sanding than I care to do by hand.
Finally, the doors. Back when we first put in an offer on the house, I'd been watching craigslist/materials and I saw a guy who had $5 doors for sale. Check out doors at any store - $5 doors are a steal! As soon as we bought the house, I measured all the doors and bought replacements for all that I could. I needed more doors than he had in one size, and he didn't have the narrowest door at all, but still - I got good doors for a great price. They've been patiently waiting in the garage. I'm just going to repaint the smallest door, and maybe I'll order a matching one at HD or Lowe's in the future. I think having off white doors will really open up the hall - the dark chocolate doors make it feel cramped and gloomy. To work on the doors, all I need is a sander, some paint, and a space to paint them. The hinge screws on the existing doors are pretty stripped, so I need more hinge screws. I also need a hole saw, because my doors are blanks.
What else would I need to fix the front room at the same time?
I looked pretty carefully at the front room. The beadboard doesn't run all the way to the door openings to the kitchen and hall. For the kitchen, I can reuse the trim and trim around the doorway. The hall opening wouldn't look right trimmed, and the existing beadboard is too short. I could take it down or I could buy one new sheet of beadboard and replace it. I thought the room would look even weirder with only one beadboard wall - and we do like the looks of the stuff - so I'd need to buy a sheet of beadboard. I'll also need baseboard, chair rail, caulk, an orbital sander, trim paint, and wall paint. I have some crown molding left over, and I might add crown to the front room too. I might need another piece for that, though.
What's my tally so far?
Door trim. Baseboard. Quarter round. A rubber mallet. Cheap thresholds. Caulk. Paint. Two types of hole saws. Some screws. A sander. A sheet of beadboard. Chair rail. Crown molding.
There's a reason I keep listing "a sander" over and over again. If I only needed the sander for scuffing up the door trim, maybe I wouldn't buy one right now. I'd do a little cost/benefit analysis to buying a sander - it's how many extra hours of work versus the price of a sander and some pads? But since I need the sander for trim, doors, and beadboard, it's totally worth it.
Let's talk about the thresholds. If I am going to pull the floor and replace the peeling piece of laminate, due to how the floor's laid out, I'll have to pull a threshold. Those things are really cheap and really hard to reuse, so I'll buy a new one. The aluminum ones look stupid and cheap. I like the oak ones... but do I really want to splurge on an oak threshold for a floor I don't like? Nah, probably not - I'll just get a matching aluminum threshold.
I talked with my husband and we decided this is an affordable project that will add a lot to our enjoyment of the house / potential resale value. It's a go!
Thursday, January 6, 2011
Expectations
Do you hate something about your house? You can probably change it, all by yourself - you just need to know what you're up against.
The first thing you should know is that contractors - even the absolute best - constantly run into difficulties too. We're just really good about hiding it until the homeowner is out of earshot, then it's a lot of whispered "oh shit, what are we going to do about that!!" What you're doing when you hire work out is paying for someone else to deal with problems, and paying for expert tools and knowledge. If you start a simple project that rapidly spirals into a horrible mess, it's not because you're cursed. ;)
The second thing you must consider is what your expectations are. The most obvious way to explain this is to ask yourself how long you're going to live in your current house. If you're flipping the house (ahahah, remember back in 2005, when people actually flipped houses and made money??) you'll fix things as quickly and cheaply as possible. If you're going to retire here, you want to spend the time and money to do it textbook-perfect. If you're somewhere in the middle - maybe we'll get something smaller when the kids go to college; maybe we'll get something bigger if we have kids; maybe we'll move thousands of miles in a couple of years - then you're trying to strike a balance.
Here's an example: My kitchen, as I constantly remark, is carpeted. I want to rip up the carpet and put down tile. But wait - that's a really good time to put in new cabinets. And fix the ugly drop ceiling with the heinous yellowed fluorescent fixtures. And get a nicer countertop. But doing all that takes "fix the floor" from a three or four digit project to a five-digit HELOC nightmare. How long will we live here? How badly do I hate those cabinets and that light fixture?
My personal answer - I'm not sure. Right now, I'm leaning toward leaving the functional and not unattractive countertop in place, painting the cabinets, and possibly getting new doors for them. I really hate the lights, but again, they're amazingly expensive, so they'll stay for now. Tiling the floor is on the list, but it's not at the top.
My third point that I'd like you to keep in mind: You will not get back what you spend on your kitchen and bathroom. Until you've done one, you have no idea how fast those two areas add up. If there's any chance you're going to move in, say, the next five years, resist the temptation to Better Homes and Gardens your kitchen and bathroom. Prospective buyers care much more about usability than they do about the whirlpool or the granite countertops. Now, if you're going to stay 10 or more years, knock yourself out. But don't fool yourself about the investment value of your tiled backsplash.
Next up: a look at my current Project, along with how I narrowed it down and how I'm tackling the little steps.
Subscribe to:
Posts (Atom)