Saturday, February 26, 2011

From zero to hero

Here's the awful bathroom when we moved in:
Master bath

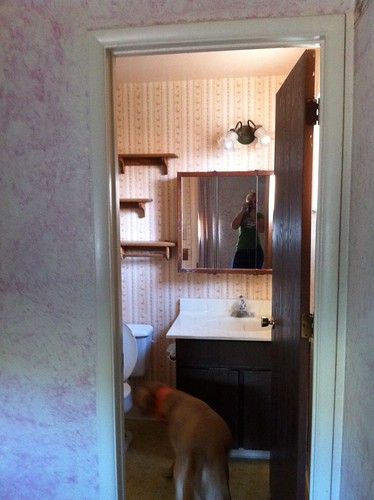
Busy floral wallpaper. Ceiling and door trim painted pink to match the wallpaper. Wooden shelves, one towel rack, very dark vanity and door. The tub and sink are inoffensive beige cultured marble, and the floor has the original yellow linoleum.

(You can also see the awful hot pink and white crackle finish in the bedroom - I got that fixed before we even moved in.)

I hated the bathroom, but set it as a pretty low priority. When I painted the front room, I ended up with almost a gallon of yellow paint left over, and I started thinking about painting the bathroom yellow. I decided a tiny bright yellow room would actually look pretty good with our existing bathroom furnishings.

I should be finishing the hall, because it is a sign of good moral character to promptly finish what you start, plus it gets depressing when you demolish too many rooms in a house at once. But you know what? With G in SF, there's no responsible adult here to tell me what to do! Hahahahah! Last week I started peeling wallpaper.

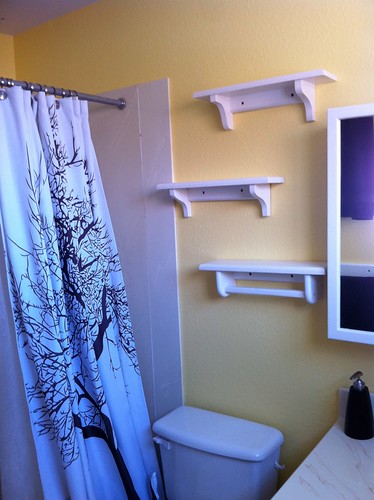
I got all the wallpaper off and scrubbed the glue off of the walls without damaging them too badly. One of the seams near the shower had peeled, and those cretins had glued it back down with Elmer's glue. I carefully cut the Elmer's off the wall - took a little of the sheetrock paper with it - then figured out how to match the texture. I sanded and primed all of the wooden fixtures and the walls, then painted the walls yellow and all the wooden trim white. Painting the wooden shelves took for-freakin-ever, but I didn't want to buy more and I thought they'd break up the yellow and look cute white.

Today I got everything put back together.

Here's the little white shelves and our awesome shower curtain:
IMG_2634

White vanity, 33-year-old lino:
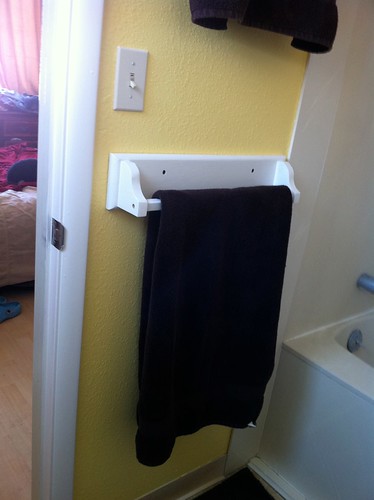
IMG_2635

Towel racks:
IMG_2637

I have the wooden plugs that cover the screw holes, but I think I'm just going to caulk the holes and touch up the paint there. The little wooden plugs are gonna be a horrible PITA to paint, and I'm ok with just covering the holes.

I also need to finish the door. I yanked a bunch of doors off their hinges and leaned them against various walls and they're half-primed. I am really tired of not having any doors anywhere, so maybe I'll work on doors tomorrow. They're very hurry-up-and-wait tedious.

Ok, is there anything you'd like to hear more about from the bathroom? I can go into my usual great amounts of detail about how I peeled the wallpaper and prepped the walls, matched the texture of the sheetrock, or painted the walls and/or the trim.

I am really awful about shopping for accessories. I feel like I should acquire some complementary knickknack things for those shelves but I have no idea what. I am going to look for a chocolate-brown hand towel on Amazon, though.

Thursday, February 17, 2011

Dithering

Obviously, I've slowed down on the hall project. I keep dithering about what piece to tackle next - I'm trying to maximize my time and use of consumable materials and I'm wasting more time that I'd potentially save. I thought I'd write up a rough post about where I can go next, so you can see my thought process.

The hall floor needs an annoying bit of detail work. I need to finish the linen closet, rip some boards for the back of the coat closet, and cut tiny little nubs of hardwood and glue them in place under the door trim. (Once I get around to it, I'll take pics, so this will eventually make sense.) This requires getting in the garage.

(Getting in the garage: I have to figure out what's wrong with the light in the garage - is it too cold, is the ballast shot, or does it just need new bulbs? It's too cold to just leave the garage door open - my well pressure tank lives in the garage, and I don't want to freeze my pipes yet again.)

The baseboard and quarter round need to go up. The quarter round needs priming, but I can do that before or after I nail it up. Cutting the trim requires getting in the garage. Priming the QR is unbelievably tedious with a brush, but it'd be a piece of cake if I had a roller already handy.

Many doors need priming, then painting. I'll roll them with primer, then brush it out to get the nice brush marks. I just need a place to work on them - I was thinking of doing them in the garage in our balmy spring weather, but balmy spring has deserted us and roaring winter is back. Too cold. I can clean out one of the spare bedrooms. If I do the doors before the trim, I can prime that QR at that point. I will run out of primer and trim paint soon, so I need paint.

I need to paint the hall walls again - I only put one coat on them before, and all the construction has left lots of smudges. I don't have enough paint though. Need more paint.

I finally took down the dysfunctional smoke detector in the hall - but it's hard-wired. I could cap it or just replace it with another AC smoke detector. Ordered one from Amazon yesterday.

I have decided I deserve better caulk so I'm going to get 2 tubes of White Lightning.

I think I have four options: floor, walls, trim, doors. What I should do is finish the floor, then trim, then get paint and do the walls, doors, and finish trim painting. But I'm about to get snowed in - not so I can't get out, but to the point where it would be prudent to not go out unless I must. So I think I'll figure out the garage light, then go buy paint and caulk, then come home and make the best of it.


edit: I'm not going anywhere, because the damn truck is dead. Let's see what heroic measures the warranty covers this time...

Wednesday, February 16, 2011

Don't buy DAP caulk!

It's like I live to torpedo any chance I may ever have of becoming a highly paid sellout blogger. I cuss a lot and post intermittently and rant against products I hate.

I'm caulking the door trim and I was overwhelmed by the irresistible urge to come tell you how awful DAP caulk is. You probably don't even realize it's awful because it's everywhere and it's often the only choice, but there are much better caulk products out there. I checked a bunch of places in Reno and got frustrated and bought like 5 tubes of DAP, then I found White Lightning at the Lowe's on Kietzke.

White Lightning makes a lot of good products. The Window and Door is probably good, the 3006 is good, and the Painter's Preferred is good. Sherwin Williams in Memphis had something else that was really good - I can't remember what it was called. SW's in Reno do not. Just fucking DAP.

Good caulk in a good caulk gun will not fall out of the crack you're caulking. It will not keep oozing out of the gun when you set it down. It's stiffer and not as slimy and it's much much easier to work with. Find better caulk and your life will be so much easier. I can't tell you how tempted I am to throw the last tube and a half away and go buy some damn White Lightning.

Friday, February 11, 2011

Nine doors

This stupid hallway. It has nine doorways and eight doors. (There's no door to the laundry room - previous owners took it down and I'm not missing it.) Anyway, that means nine doorways to trim, nine doorways to caulk and fill, nine doorways to cut in around, nine doorways to paint, and eight doors to paint. I got the door trim up today. I should take pics so you can see how crappy it looks before I putty and caulk it. I used all the MDF trim and most of the oak trim - had to piece two doorways together, but I think they'll work.

Friday, February 4, 2011

The hall flooring is done*

*Ok I'm really splitting hairs here - the hall is done but the linen closet is not done yet. I just flat ran out of time today. Had a bunch of other chores to do, and I multitasked like a pro but didn't have time to go back to that closet yet.

I'm really happy. I put the old aluminum thresholds back down, and as ugly as they are they made a huge difference. If you look at the floor only, it looks like a real room, not a construction site. And I got all the wood out of the bedroom! I think the hall is going to look really, really sharp when it's done - and it definitely feels like the end is in sight now.

I know I'm just amped because I got the scariest part of the project done. I think I mentioned I've never actually laid a whole room of hardwood before? I've refinished it, and I've repaired it, which is trickier in some ways, but I've never done a 16' run of it. The boards at the end, by the cat room (the room with the piles of wood still present) are off by maybe 1/4". I'm very satisfied with that. I feel confident that I could lay hardwood in any room in this house, and I'm officially on the lookout for small lots of utility grade stuff on Craigslist.

Next up: trim. Next week I'll roll the walls twice, then put up all the door trim. Then I'll lay baseboard til I run out, then buy enough to finish and buy the quarter-round... although I might change that plan and tack the QR to the baseboard before I put it up. I've got the standard 3/4" expansion gaps at the sides of the wood, and it'll be a bitch to keep the baseboard from falling down in the gap. If the QR was tacked to it, it wouldn't fall down in the gap.

Once I get the trim up, I can clear out one of the spare bedrooms and set it up to paint doors. I have those cheap new doors in the garage, but I'm actually really happy with the way the current doors look painted white. The dark woodgrain stuff looks surprisingly good with white semi-gloss. They'll all need trimming - the hardwood is a bit higher than the old carpet and laminate, so they'll drag or not shut right.

I like to paint doors standing up. A lot of sites recommend laying them on sawhorses and painting them flat, to avoid runs, but if your paint is running you're doing it wrong. Painting a door that's standing up is easier IMO than bending over to paint one that's horizontal. You can lean a lot more doors against walls than you can put them on sawhorses, and you can carefully flip them before the paint is cured - you can't do that if you're laying them flat.

There's still a lot of work to do, but it's really shaping up nicely.

Hall floor is finished from Funder on Vimeo.

Tuesday, February 1, 2011

No measuring

Today I got half of the "short" side of the hall laid.


It's taking longer than the "long" side because there's much more cutting involved. Tomorrow the trimmer is coming to give Dixie a pedicure, then I need to go to the grocery store, so I might not get finished with the floor til Thursday.

I'm not as wiped-out tired tonight, so I thought I'd write about how to cut without measuring. This is a pretty common trick, so you might already know it - but if not, it's a lifesaver.

Let's say you need to cut a rectangular piece of flooring into an L-shape, to fit around a door jamb.

First, slide the flooring up against the door jamb and make a mark. This shows you how wide the L piece is going to be.


Next, hold the flooring up so it butts* into the corner / the next piece of wood - it won't lay down on the floor because the door trim is in the way, but you don't need it to. Make a mark here - this will show you how long the L will be.


Use a speed square to mark straight lines. If you were careful when you lined up for the two marks, you will have a perfect cut - no measuring necessary.


I usually do the cut across the grain on the miter saw, then finish the rip cut along the grain with, sigh, my circular saw. (A table saw, a table saw, my kingdom for a table saw!) Because I've marked on the top and I'm cutting from the top, the cut piece won't quite fall out on its own. A hacksaw or a coping saw will finish the job pretty quickly.

You can do something very similar when cutting off the ends of flooring boards, too. Let's say you're working this row from left to right - you have a board or boards filling up most of the space from the left wall, and you have a little space to fill against the right wall. So the board you want to cut needs to have the RIGHT side cut off. If you flip the board 180 degrees - so the tongue is touching the tongue of the previous row - you can make a mark based off of the boards on the left you've already laid. Cut the mark, flip the board back around so the cut side is against the right wall, and you're golden. Remember when you're marking to stick a little spacer against the wall to allow for expansion.

Does that make sense? This blog is going to either drastically improve my writing or make me give up in despair. Describing home repairs is excruciatingly hard!

*Heh heh, heh heh. I said "butts." Heheh, heheh.