Shit's breaking again so I'm resurrecting this blog!
Saturday I had a lovely hot shower, then rode my horse. I came home sweaty and smelling horsey, so I took another shower - but it was on the cold side of lukewarm. When I got out, I flipped the breaker off and back on then left it alone for the night.
Sunday, no hot water. I called a plumber and left a message to maybe get it fixed Monday, but my friends on Facebook heckled me into working on it myself.
Electric water heaters are actually pretty simple machines. There are two (copper) water pipes on top: cold water goes in, hot water comes out. There's a flex conduit line (silvery) for the wiring. Inside the water heater, one or two elements and thermostats make the water hot. I think two-element heaters are more common. Down at the bottom, there's a drain, and somewhere there's a little lever to release pressure. That's pretty much it.
Here's a fabulous video:
This is the main site I used. It helped me immensely.
I went and bought a digital multimeter for $25, then came home and tested stuff. I turned off the power at the breaker and checked it at the tank, like the video shows.
Here's my first problem: the multimeter I bought isn't labeled exactly like the one in the link. He says something like "set your multimeter on RX1 to test resistance" but mine doesn't say RH1 anywhere on it! Mine has the cryptic Greek symbols. So I had to look up what they mean - amultimeter.info was really helpful. Eventually I figured out that the horseshoe symbol measures resistance in Ohms, so I was ready to check the parts.
I checked both the heating elements, and they were good (normal is 11-14 Ohms, apparently, and mine were both at 11.) Then my main reference site said I could check the thermostats with the power off or on, so I went to flip the power back on. The breaker wouldn't stay flipped, which is always a Bad Sign.
I gave up in despair for the night. My friends on Facebook convinced me that drunk rednecks change out breakers all the time and rarely die and bombarded me with more helpful professional youtube videos.
This morning, I boiled two stock pots full of water to fill my little camping solar shower. I felt a lot better when I was clean, but the whole experience made me even more determined to fix the damn water heater already.
I took a picture of the breaker and headed back to my local hardware store. We all stared at it and compared it to the breakers on sale (there are several similar looking types) and picked out the one that looked right. I went home, read up on what I was doing one more time, and took the breaker box apart. Once I triple checked that the only power left in the box was the wires to the main breaker, I unscrewed the bad breaker, held my breath, and yanked it out of the box. It was narrower than the replacement.
Back to the hardware store, where I swapped the part out. Back home and I reassembled the breaker and turned the power back on. The water heater still wasn't hot, so I went back to the main site and tested the thermostats. The top one was fine, but the bottom one was bad (A 1 on my multimeter - I think that means infinite resistance.) I pulled it out and inspected it - it was kinda melty looking and one of the screws was charred.
Back to the hardware store. They were out of bottom thermostats, so I went 10 miles further to Home Depot and got a replacement thermostat and a new piece of wire. When I got back home, I wired the new thermostat in, reassembled everything, and turned the power back on and I was immediately rewarded with that water-getting-hot sound.
I rule!
Sunday, December 11, 2011
Wednesday, July 6, 2011
Mystery plant revealed
So the mystery plant in the garden reached immense size last week.

Right before I left for the weekend, I noticed that it had little broccoli-like florets on it. Ah-hah! I thought. I've grown a mutant broccoli plant.

When I came back it had bolted and the florets had bloomed.

I stared at it for a while and decided it had to go. It was shading out everything else in the garden, and I don't think broccoli leaves are good to eat, and it obviously hadn't formed proper heads. Maybe my homemade compost had mutating powers?
But when I pulled it I discovered it was a Turnip of Unusual Size.

Almost three pounds of turnip!

I have no idea if a bolted extremely large turnip is good to eat. I suppose I'll give it a shot - if it's awful, the chickens will probably nom it down.
Right before I left for the weekend, I noticed that it had little broccoli-like florets on it. Ah-hah! I thought. I've grown a mutant broccoli plant.
When I came back it had bolted and the florets had bloomed.
I stared at it for a while and decided it had to go. It was shading out everything else in the garden, and I don't think broccoli leaves are good to eat, and it obviously hadn't formed proper heads. Maybe my homemade compost had mutating powers?
But when I pulled it I discovered it was a Turnip of Unusual Size.
Almost three pounds of turnip!
I have no idea if a bolted extremely large turnip is good to eat. I suppose I'll give it a shot - if it's awful, the chickens will probably nom it down.
Thursday, June 30, 2011
Vinca
I planted some vinca in a weird little part-shade area beside the house. It's the east side, shaded in early morning by the property fence and in the afternoon by the house itself.
I ripped out all the weeds
Dug out the sandy soil about 4" deep
Amended it with my half-done compost and shoveled the sandy soil back on top
Laid a dripline and spaced the plants right on the drip holes

And mulched with waste hay.
I think they'll be happy there. They don't grow very tall, but they spread nicely (at least the non-variegated ones do - that's why I bought more of them.) The dripline and the low plants means I won't be watering the side of the house and causing problems down the line. They never need mowing or pruning - all they want is shade and some water.
I ripped out all the weeds
Dug out the sandy soil about 4" deep
Amended it with my half-done compost and shoveled the sandy soil back on top
Laid a dripline and spaced the plants right on the drip holes
And mulched with waste hay.
I think they'll be happy there. They don't grow very tall, but they spread nicely (at least the non-variegated ones do - that's why I bought more of them.) The dripline and the low plants means I won't be watering the side of the house and causing problems down the line. They never need mowing or pruning - all they want is shade and some water.
Tuesday, June 21, 2011
Solstice planting, or, Home Depot wins again
Over the weekend, I'd talked to the G&AWS about gardening. I suspect it's ridiculously easy to grow stuff in the Bay Area. Maybe your tomatoes and peppers don't get enough sunny days to really mature. Boo hoo. AWS has a wee Meyer lemon tree! on her patio! Super jealous.
I haven't really planted much here because anything but the hardiest of plants needs water, and that means drip irrigation, and I haven't put one in because they're expensive or something. Also they require commitment - I would really have to figure out where I want to plant stuff and have a plan and follow through with it.
Oh well, it can't hurt to look, right? I went to Home Depot, just to see how expensive drip systems are. Turns out there's a decent starter kit for $20. No controller, of course, but all the lines and fittings you'd need for a couple of flower beds. In a daze, I put the starter kit in my cart and walked slowly over to the garden section.
I spent a full hour looking carefully at every. single. sun-loving. plant. Eventually, I bought a red climbing rose to go on the chain link fence, and a couple of little daylilies to hang out near it. And a lavender, because I've always wanted one, and a sage, because everything tastes better with sage. AND a half-flat of marigolds. AAAND a cucumber and a cantaloupe. (I still don't know what the Mystery Plant is, but this way I'm hedging my bets.)
My total bill was substantially more than $20.
Here's the rose fence. (Laura inspired me!) I figure I should give the poor thing a couple days to settle in before I unhook it from its poles and train it onto the fence.

Lavender and sage:
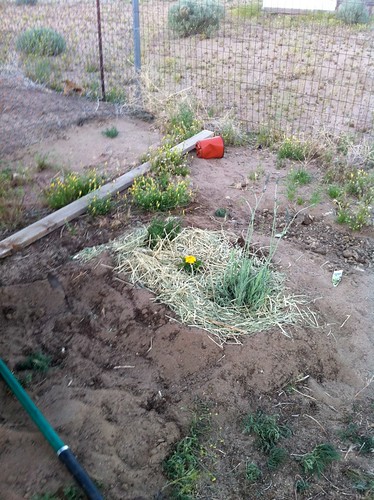
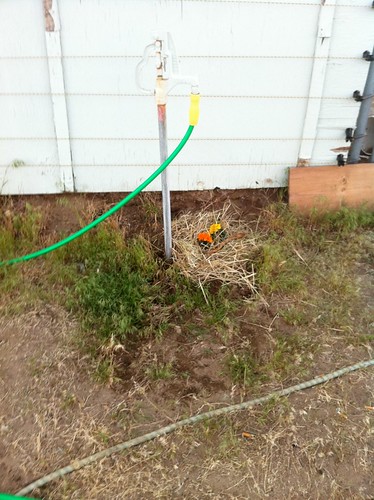
I uprooted the volunteer cheatgrass that thrives in the drip from the faucet and planted some marigolds there.
I put a bunch of marigolds in the halfhearted garden bed.

One of those damn banties escaped while I was gone and did some serious damage to my seedlings. I spent the morning reinforcing my chicken fence. (The other banty is setting on a huge clutch of eggs in the Dogloo!) Anyway, she's hopefully contained now!
Yes, I am mulching with sundried hay. Maybe it has weed seeds and I'll regret this, but I don't mind a little weeding. :)
Now, all I have to do is dig up the buried water line, put a new FF hydrant in, and install the drip irrigation. Oh, and find homes for the remaining 15 marigolds. Maybe I didn't really need a half-flat. :o
I haven't really planted much here because anything but the hardiest of plants needs water, and that means drip irrigation, and I haven't put one in because they're expensive or something. Also they require commitment - I would really have to figure out where I want to plant stuff and have a plan and follow through with it.
Oh well, it can't hurt to look, right? I went to Home Depot, just to see how expensive drip systems are. Turns out there's a decent starter kit for $20. No controller, of course, but all the lines and fittings you'd need for a couple of flower beds. In a daze, I put the starter kit in my cart and walked slowly over to the garden section.
I spent a full hour looking carefully at every. single. sun-loving. plant. Eventually, I bought a red climbing rose to go on the chain link fence, and a couple of little daylilies to hang out near it. And a lavender, because I've always wanted one, and a sage, because everything tastes better with sage. AND a half-flat of marigolds. AAAND a cucumber and a cantaloupe. (I still don't know what the Mystery Plant is, but this way I'm hedging my bets.)
My total bill was substantially more than $20.
Here's the rose fence. (Laura inspired me!) I figure I should give the poor thing a couple days to settle in before I unhook it from its poles and train it onto the fence.
Lavender and sage:
I uprooted the volunteer cheatgrass that thrives in the drip from the faucet and planted some marigolds there.
I put a bunch of marigolds in the halfhearted garden bed.
One of those damn banties escaped while I was gone and did some serious damage to my seedlings. I spent the morning reinforcing my chicken fence. (The other banty is setting on a huge clutch of eggs in the Dogloo!) Anyway, she's hopefully contained now!
Yes, I am mulching with sundried hay. Maybe it has weed seeds and I'll regret this, but I don't mind a little weeding. :)
Now, all I have to do is dig up the buried water line, put a new FF hydrant in, and install the drip irrigation. Oh, and find homes for the remaining 15 marigolds. Maybe I didn't really need a half-flat. :o
Sunday, June 12, 2011
Poodle defense established
You may remember the poodle story from last month. Well, today the damn poodle came BACK! I was sitting in the den drinking coffee (why does this little bastard only show up when I'm undercaffeinated?) with the patio doors open and clicketyclicketyclickety here it comes hauling ass across my yard. Thank god Banders was inside. I managed to keep Cersei in, slam the door in the poodle's face, and yell "GO HOME POODLE" at the top of my lungs til it got bored and left. Hopefully its stupid human heard me yelling, but she obviously has no real control over the dog.
Like, it's a poodle. It's not ravaging my livestock or even really inconveniencing me. It just sucks that I have to stay on guard - can you imagine how badly that scene could've gone if that stupid dog ran inside my house and set the crackninja off and then got in a fight with Cersei? And it totally wanted to come inside too! fffffffff
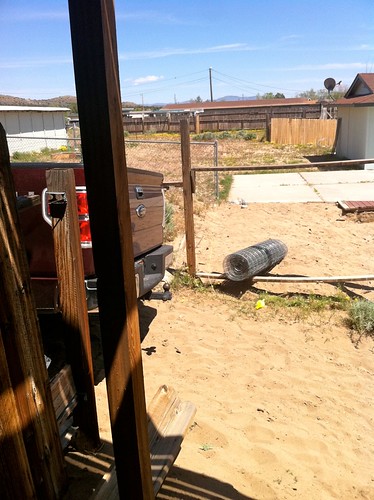
So I went to Home Depot and bought crap to put up a crappy fence. See, the old crappy fence blew down in the neverending spring blizzards, and I can't make a commitment to where I want to put up a new nice fence - or even what kind of fence I'd put up if I could just figure out where!

Here's the sat view of our poor backyard, at some point before we bought it. You can see the green pool, the white propane tank, the black .. thing? trampoline? The white square is the concrete patio - the hot tub is just peeking out of the shadow of the house.
Here it is today.
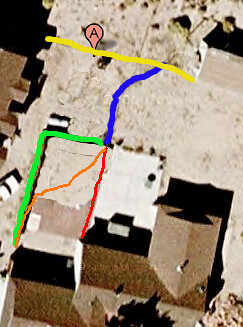
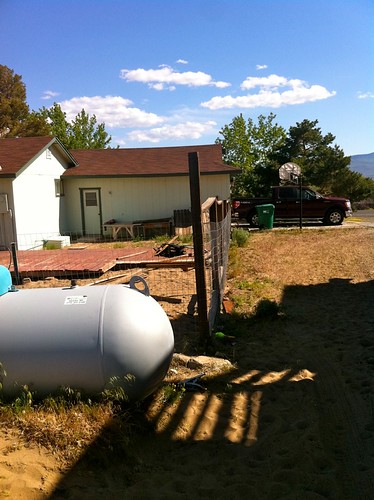
Yellow is the horse paddock hotwire. Blue is a perfectly nice run of chain link, with a nice double gate (not shown). I took out the pool (and black mystery object) so you can see how weird the remaining piece of deck looks and how it affects the yard and fenceline. The green line is the wooden privacy fence that blew down. Red and orange are my other options for fencing the backyard permanently.
The L-shaped green fenceline doesn't make much sense without the pool there. But I've still got some usable posts there, so that's where I ran the poodle fence.
I bought 100' of 4' welded wire, some chain link fence thingies, a come-along, and some bolts to make the fence stretcher thingie. I also got some t-posts to fill in the gaps, but honestly, I'm not sure if I'm going to use them. This isn't a permanent fence, it's not sagging, and I don't know if I am even going to bother with t-posts.
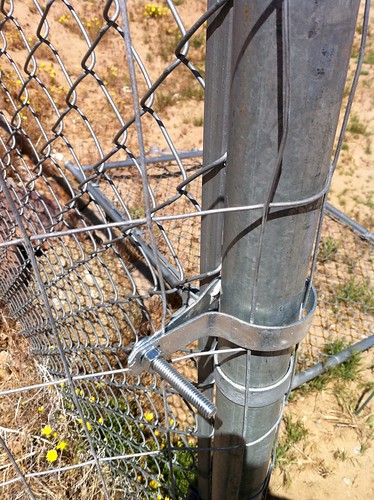
I used the chain link fence thingies to hook the welded wire on to the nice chain link fence post.
The only reliably sturdy object to hook the come-along to is, of course, my truck.
Here's the fence puller thingie. It's a scrap 2x4 cut in half, then clamped together, with holes drilled through both boards. While it was still clamped I made some random little reference marks - the sharpie lines.
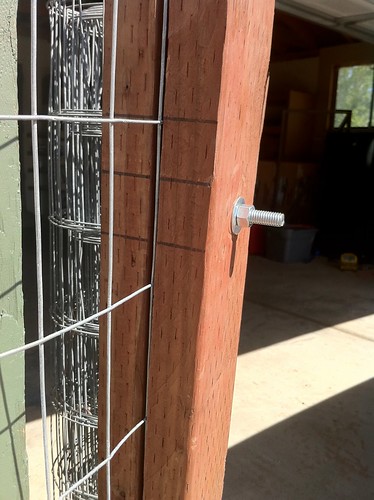
That's so I can easily tell if I've got the boards both facing the right direction or not. Anyway, you put one board on each side of the end of the fencing. Bolt the boards together with your carriage bolts, and the pull from your come-along is more evenly distributed.
The fence looks damn fine for a first practical application of theoretical knowledge. I mean, I have seen dudes use come-alongs, and I understand the theory of fence-stretching, but I'd never really DONE this before.
The short leg of the L has no freakin line posts at all, and if I get off my lazy ass and pound t-posts tomorrow this is where I'll pound them. It's about 25'. That is pretty tight for welded wire!
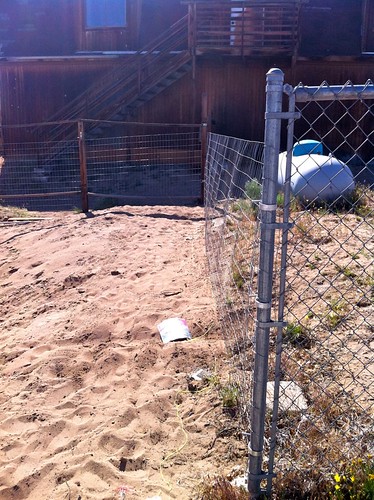
The long side came out good too.
It all looks pretty awful, what with the jacked up old posts and the trash that needs picking up and the general weirdness of the deck and arrrgh. But at least I can drink coffee in peace, I hope.
For bonus poodle defense points, I shoveled dirt all along the bottom of the fence. I mean, the stupid thing can still dig in pretty easily, but if that damn poodle digs in to my fence, I'm just going to let Banders kill it.
Like, it's a poodle. It's not ravaging my livestock or even really inconveniencing me. It just sucks that I have to stay on guard - can you imagine how badly that scene could've gone if that stupid dog ran inside my house and set the crackninja off and then got in a fight with Cersei? And it totally wanted to come inside too! fffffffff
So I went to Home Depot and bought crap to put up a crappy fence. See, the old crappy fence blew down in the neverending spring blizzards, and I can't make a commitment to where I want to put up a new nice fence - or even what kind of fence I'd put up if I could just figure out where!
Here's the sat view of our poor backyard, at some point before we bought it. You can see the green pool, the white propane tank, the black .. thing? trampoline? The white square is the concrete patio - the hot tub is just peeking out of the shadow of the house.
Here it is today.
Yellow is the horse paddock hotwire. Blue is a perfectly nice run of chain link, with a nice double gate (not shown). I took out the pool (and black mystery object) so you can see how weird the remaining piece of deck looks and how it affects the yard and fenceline. The green line is the wooden privacy fence that blew down. Red and orange are my other options for fencing the backyard permanently.
The L-shaped green fenceline doesn't make much sense without the pool there. But I've still got some usable posts there, so that's where I ran the poodle fence.
I bought 100' of 4' welded wire, some chain link fence thingies, a come-along, and some bolts to make the fence stretcher thingie. I also got some t-posts to fill in the gaps, but honestly, I'm not sure if I'm going to use them. This isn't a permanent fence, it's not sagging, and I don't know if I am even going to bother with t-posts.
I used the chain link fence thingies to hook the welded wire on to the nice chain link fence post.
The only reliably sturdy object to hook the come-along to is, of course, my truck.
Here's the fence puller thingie. It's a scrap 2x4 cut in half, then clamped together, with holes drilled through both boards. While it was still clamped I made some random little reference marks - the sharpie lines.
That's so I can easily tell if I've got the boards both facing the right direction or not. Anyway, you put one board on each side of the end of the fencing. Bolt the boards together with your carriage bolts, and the pull from your come-along is more evenly distributed.
The fence looks damn fine for a first practical application of theoretical knowledge. I mean, I have seen dudes use come-alongs, and I understand the theory of fence-stretching, but I'd never really DONE this before.
The short leg of the L has no freakin line posts at all, and if I get off my lazy ass and pound t-posts tomorrow this is where I'll pound them. It's about 25'. That is pretty tight for welded wire!
The long side came out good too.
It all looks pretty awful, what with the jacked up old posts and the trash that needs picking up and the general weirdness of the deck and arrrgh. But at least I can drink coffee in peace, I hope.
For bonus poodle defense points, I shoveled dirt all along the bottom of the fence. I mean, the stupid thing can still dig in pretty easily, but if that damn poodle digs in to my fence, I'm just going to let Banders kill it.
Friday, June 10, 2011
Swamp cooler
I spent a couple days this week getting the swamp cooler working properly again. It hadn't worked correctly since we bought the house. It was totally jury rigged and it's a wonder it blew cool air at all, but now it's running pretty close to perfect.
I didn't know what a swamp cooler was til I moved out West. It's an evaporative cooler - a pump moves water from a reservoir to the top of the unit, where the water trickles down over some pads. A really powerful fan sucks air through the wet pads and blows it out into the room. Works astonishingly well in hot dry climates (and not at all in humid climates.)
The neat thing is that all the parts are remarkably standardized. I went to Home Depot and stocked up on everything (I thought) I'd need to replace and fix: water lines, pads, anti scaling stuff, and leak sealing paint stuff. Oh, and a Shop Vac. It would make the job easier - make LOTS of jobs easier. It was surprisingly easy to talk myself into a new tool :)
When I opened it up to look inside, Banders had to go investigate.

Blue float valve (broken), green pump (broken, didn't know it at the time), blue tube takes water from the pump up to the pads, white debris filter basket, random castors.

Scraped up the loose paint to reveal a lot of rust underneath. (The shop vac worked perfectly!)

Painted it with asphalt leak-stopper stuff and left it to dry overnight.
I replaced the gross aspen pads with some kind of blue fluffy synthetic stuff. Installed a new float valve and swapped the disgusting pump tube with a new one. On to the plumbing!
The previous owners plumbed the swamp cooler the normal way, with 1/4" tubing that ran under the house (from the nearest water line in the kitchen), out the vent nearest the cooler, and up to the cooler by that float valve. But for some reason, they didn't put in a way to drain the line, so the line froze and broke. They crawled bravely under the house and turned off the water at the kitchen end of things, then the summer after that they hooked up a garden hose. But the hose led to a frost-free hydrant, not a twist-knob spigot - so the water is either on or off, so it's either overflowing the swamp cooler or running dry. Classy!
Here's the heart of what I did:

I wanted to be able to turn the water off for winter and drain the exterior section of the line without crawling a terrifying quarter mile* under the house. I got as much of the work done outside as I could. The existing copper water line comes in on the left. There's a valve there to turn the water off for winter. It flows through to the T junction. The valve below the T is the drain valve - in the fall, I will turn off the water at the valve on the right, then open the lower valve and the line should clear. The new plastic line goes from the right side of the T to the outside world and up to the swamp cooler.
I used the pipe cutter to score the water lines, then used the razor blade to cut them cleanly. Ended up with super nice straight sharp cuts that way.
Anyway, there wasn't much else to do except go under the house. The den, where the swamp cooler lives, is an addition to the house. The ground under it isn't excavated as far so it's more belly crawling and less hands and knees crawling. It has many, many spiderwebs. But! The water line is only like 10' from the crawlspace entrance! I took a stick in one hand (to bash spiderwebs) and all of my tools in the other and crawled down there and did my work. Not so bad.
Next I had to go turn on the water where the copper line hooked in to the main plumbing. I took my trusty stick and went down the other crawlspace entrance, to the original house, and got pretty lost. I know, it's like a 1500 sq ft house, how can you get lost? All I can say is that it's pretty confusing, trying to figure out what room you're crawling around under. Eventually I crawled a complete circle under there and ended up at the kitchen. Where the water pipes would've led me, had I paid attention to them. And, since I was looking up trying to find my 1/4" copper line, I saw the FUCKALL BIG SPIDER when it MOVED.
I bout had a heart attack, yall. I know it is a totally irrational fear. Spiders are not out to get us (well, most of the time) and their bites are so rarely serious or fatal that it's a black swan event. But that's not what I'm scared of! I'm scared of dying of the heebie jeebies if I touch one! Slightly more seriously, I'm scared of giving myself a concussion by trying to leap to my feet to run away while still under the house.
So I saw this Shelob-sized** spider and had to stop for a while and breathe deeply and, I admit it, whimper. And cry. I cried down there. I cried even more when I realized the fell beast was chilling out about 2' from the very valve I needed to turn.
I quit for the day. Yeah, the waterproofing asphalt stuff needed to dry, but honestly, I couldn't face that spider. I whined on Facebook about the giant spider, and I must say, y'all were less than sympathetic.
The next day, I took a picture to prove how big Shelob was. I crawled back out from under the house to post it.

Giant shiny black spider. Living in the dry darkness under a house. Strong, sticky, irregular webs everywhere under the house. Hey, great, she's probably a black widow!
I seriously succumbed to the heebie jeebies at that point. I took off my gloves and long sleeved shirt and flailed around whacking imaginary creepy crawlies all over my body. I gradually convinced myself that they're not aggressive and that wasp spray would let me kill Shelob from a distance, and I sternly did not think about the OTHER black widows probably living down there. Plus, I decided, if I did get bitten and had to go to the doctor they might give me Xanax for the shivering gibbering horror nightmares. See? That's looking on the bright side.
After that, it was fairly anticlimatic. I crawled very slowly back under the house. I did not look around for other spiders. I sprayed the big one, crawled over, bashed her with my stick to put her out of her misery, and turned on the water.
While the reservoir filled up, I tried the pump. No luck - even when I tried it in a pan of water in the sink. $25 at the hardware store got me a new replacement pump. Yes, I tested it in the pan of water in the sink, and yes, it immediately sprayed a jet of water down the countertop, and yes, I felt pretty dumb. But it also worked perfectly when I plugged it in in the swamp cooler.
Here's the new setup (with the old cooler - but the new one is identical).
The tan line coming out of the blue line is a bleed-off line. We have hard well water, and the swamp cooler was pretty crusted up with minerals. I think that's what killed the old pump, actually. The idea is that as the water evaporates, it leaves minerals behind, so the total water in the swamp cooler becomes more and more mineralized. The bleed-off valve will dump some of the heavily mineralized water outside, and new fresh water will come in to replace it. The problem is that the bleed-off valve dumps water faster than the intake line delivers it, so I'll just need to manually bleed the system every so often. I can just open the cooler, hang the bleed line outside the cooler, and let it dump some of the water.
Anyway, that is my story of bravery and cleverness. I will let you know if I actually got bitten and haven't noticed. (Jane - I have a migraine today, which is uncommon but not unheard of, and I'm totally convinced I did get bit.)
Next up - I swapped out an ugly ceiling fan and an ugly light fixture for more attractive ones. I could write about that?
*possibly a slight exaggeration.
**I had that 1978 Brothers Hildebrandt LOTR calendar! Anybody else remember it?
I didn't know what a swamp cooler was til I moved out West. It's an evaporative cooler - a pump moves water from a reservoir to the top of the unit, where the water trickles down over some pads. A really powerful fan sucks air through the wet pads and blows it out into the room. Works astonishingly well in hot dry climates (and not at all in humid climates.)
The neat thing is that all the parts are remarkably standardized. I went to Home Depot and stocked up on everything (I thought) I'd need to replace and fix: water lines, pads, anti scaling stuff, and leak sealing paint stuff. Oh, and a Shop Vac. It would make the job easier - make LOTS of jobs easier. It was surprisingly easy to talk myself into a new tool :)
When I opened it up to look inside, Banders had to go investigate.
Blue float valve (broken), green pump (broken, didn't know it at the time), blue tube takes water from the pump up to the pads, white debris filter basket, random castors.
Scraped up the loose paint to reveal a lot of rust underneath. (The shop vac worked perfectly!)
Painted it with asphalt leak-stopper stuff and left it to dry overnight.
I replaced the gross aspen pads with some kind of blue fluffy synthetic stuff. Installed a new float valve and swapped the disgusting pump tube with a new one. On to the plumbing!
The previous owners plumbed the swamp cooler the normal way, with 1/4" tubing that ran under the house (from the nearest water line in the kitchen), out the vent nearest the cooler, and up to the cooler by that float valve. But for some reason, they didn't put in a way to drain the line, so the line froze and broke. They crawled bravely under the house and turned off the water at the kitchen end of things, then the summer after that they hooked up a garden hose. But the hose led to a frost-free hydrant, not a twist-knob spigot - so the water is either on or off, so it's either overflowing the swamp cooler or running dry. Classy!
Here's the heart of what I did:
I wanted to be able to turn the water off for winter and drain the exterior section of the line without crawling a terrifying quarter mile* under the house. I got as much of the work done outside as I could. The existing copper water line comes in on the left. There's a valve there to turn the water off for winter. It flows through to the T junction. The valve below the T is the drain valve - in the fall, I will turn off the water at the valve on the right, then open the lower valve and the line should clear. The new plastic line goes from the right side of the T to the outside world and up to the swamp cooler.
I used the pipe cutter to score the water lines, then used the razor blade to cut them cleanly. Ended up with super nice straight sharp cuts that way.
Anyway, there wasn't much else to do except go under the house. The den, where the swamp cooler lives, is an addition to the house. The ground under it isn't excavated as far so it's more belly crawling and less hands and knees crawling. It has many, many spiderwebs. But! The water line is only like 10' from the crawlspace entrance! I took a stick in one hand (to bash spiderwebs) and all of my tools in the other and crawled down there and did my work. Not so bad.
Next I had to go turn on the water where the copper line hooked in to the main plumbing. I took my trusty stick and went down the other crawlspace entrance, to the original house, and got pretty lost. I know, it's like a 1500 sq ft house, how can you get lost? All I can say is that it's pretty confusing, trying to figure out what room you're crawling around under. Eventually I crawled a complete circle under there and ended up at the kitchen. Where the water pipes would've led me, had I paid attention to them. And, since I was looking up trying to find my 1/4" copper line, I saw the FUCKALL BIG SPIDER when it MOVED.
I bout had a heart attack, yall. I know it is a totally irrational fear. Spiders are not out to get us (well, most of the time) and their bites are so rarely serious or fatal that it's a black swan event. But that's not what I'm scared of! I'm scared of dying of the heebie jeebies if I touch one! Slightly more seriously, I'm scared of giving myself a concussion by trying to leap to my feet to run away while still under the house.
So I saw this Shelob-sized** spider and had to stop for a while and breathe deeply and, I admit it, whimper. And cry. I cried down there. I cried even more when I realized the fell beast was chilling out about 2' from the very valve I needed to turn.
I quit for the day. Yeah, the waterproofing asphalt stuff needed to dry, but honestly, I couldn't face that spider. I whined on Facebook about the giant spider, and I must say, y'all were less than sympathetic.
The next day, I took a picture to prove how big Shelob was. I crawled back out from under the house to post it.
Giant shiny black spider. Living in the dry darkness under a house. Strong, sticky, irregular webs everywhere under the house. Hey, great, she's probably a black widow!
I seriously succumbed to the heebie jeebies at that point. I took off my gloves and long sleeved shirt and flailed around whacking imaginary creepy crawlies all over my body. I gradually convinced myself that they're not aggressive and that wasp spray would let me kill Shelob from a distance, and I sternly did not think about the OTHER black widows probably living down there. Plus, I decided, if I did get bitten and had to go to the doctor they might give me Xanax for the shivering gibbering horror nightmares. See? That's looking on the bright side.
After that, it was fairly anticlimatic. I crawled very slowly back under the house. I did not look around for other spiders. I sprayed the big one, crawled over, bashed her with my stick to put her out of her misery, and turned on the water.
While the reservoir filled up, I tried the pump. No luck - even when I tried it in a pan of water in the sink. $25 at the hardware store got me a new replacement pump. Yes, I tested it in the pan of water in the sink, and yes, it immediately sprayed a jet of water down the countertop, and yes, I felt pretty dumb. But it also worked perfectly when I plugged it in in the swamp cooler.
Here's the new setup (with the old cooler - but the new one is identical).
The tan line coming out of the blue line is a bleed-off line. We have hard well water, and the swamp cooler was pretty crusted up with minerals. I think that's what killed the old pump, actually. The idea is that as the water evaporates, it leaves minerals behind, so the total water in the swamp cooler becomes more and more mineralized. The bleed-off valve will dump some of the heavily mineralized water outside, and new fresh water will come in to replace it. The problem is that the bleed-off valve dumps water faster than the intake line delivers it, so I'll just need to manually bleed the system every so often. I can just open the cooler, hang the bleed line outside the cooler, and let it dump some of the water.
Anyway, that is my story of bravery and cleverness. I will let you know if I actually got bitten and haven't noticed. (Jane - I have a migraine today, which is uncommon but not unheard of, and I'm totally convinced I did get bit.)
Next up - I swapped out an ugly ceiling fan and an ugly light fixture for more attractive ones. I could write about that?
*possibly a slight exaggeration.
**I had that 1978 Brothers Hildebrandt LOTR calendar! Anybody else remember it?
Monday, March 14, 2011
Spring fever
I gardened!
It's probably dumb, because we have yet another series of rain or snow storms coming in this week, but oh well - if I lose $2 worth of seeds, I'll live.
My friend M has a silver poplar in her front yard. It sends up tons of little suckers every year. She usually cuts them out and throws them away, but last fall I asked her to save them for me. Today seemed like a good day to plant them, so I went over and we dug them up and I took them home.
I'm putting them in the DMZ, the area between the perimeter fence and the horse-safe hotwire fence. It's about 10' wide so there's plenty of room for the little saplings to spread out. (The internet assures me that silver poplars aren't poisonous to horses.) They grow very fast, and they seem pretty hardy, so hopefully I'll have a decorative forest in not too many years.
I dug each little treeling a hole, filled the hole mostly full with compost, then shoved the tree in and covered it with soil. I hope the compost holds water a little better so these guys can go a little longer between waterings.
Once I had all of them in the ground, I lined my raised bed with plastic, then filled it with dirt. I alternated thin layers of compost and sand-dirt, then squatted down and really worked the layers together with my hands. I pulled out a bunch of non-compost crap (nails and sagebrush roots and bits of plastic) and a bunch of itty bitty grass shoots. Then I got really excited and planted some stuff - lettuce, spinach, radishes, broccoli, and turnips. I want to succession-plant the salad veggies anyway, so I did tiny plantings of them, and I planted a rather modest amount of broccoli and turnips. All told, I only used about 1/3 of the bed.
I don't appear to have any hand garden tools so I, uh, used a fork. A kitchen fork. It works quite well for making seed holes in fluffy prepared beds!
Then I stapled some black plastic over the whole shebang. It should keep my little seeds from freezing if it does freeze, keep the moisture in, and heat the soil if the sun ever comes back out. My earliest sprout date is 5 days from now, so I'll pull the plastic off of the bottom third later this week. Five days is Friday - but right now the low on Friday is forecast to be well below freezing. Saturday I'll be away at Rides of March, and there's no point in pulling the plastic when I get home Saturday night, so... maybe Sunday morning? I dunno what to do!
Friday, March 11, 2011
Fence rebuild
Yesterday the Leaning Fence of Pisa gave up the ghost and collapsed entirely.
Very distressing! It's not like I wander around naked, and the neighbor's house doesn't even have windows on that side, but I like having a fence there, dammit. I priced out various configurations of new fence then headed to Lowe's today and bought replacement materials.
$194 got me a pile of boards and fasteners.

Check out these clever things! (and yes, my house really is bright blue-y aqua.)
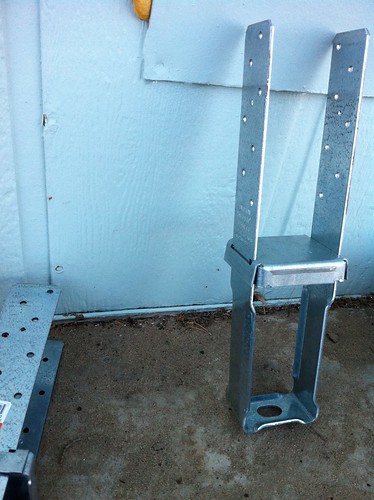
They (theoretically) obviate the need to dig a 2' deep post hole. You dig a relatively shallow and wide hole, then bury the bottom half in concrete. The 4x4 post bolts in to the top half. I oriented the gizmos so that the top flanges face the wind - it should help this thing work better if it's going to work at all.

My neighbor, on the lee of the fence, has WAY more land than I do. Unfair! The grooves in the concrete should hopefully channel rain/snow water away from the posts and help them last longer.
I'll water the ground around the brackets and leave them alone for at least three days. Hopefully the next post on the fence will be in the middle of next week and it'll show a finished fence - it's only about 20' to replace, so it won't take long.
Very distressing! It's not like I wander around naked, and the neighbor's house doesn't even have windows on that side, but I like having a fence there, dammit. I priced out various configurations of new fence then headed to Lowe's today and bought replacement materials.
$194 got me a pile of boards and fasteners.
Check out these clever things! (and yes, my house really is bright blue-y aqua.)
They (theoretically) obviate the need to dig a 2' deep post hole. You dig a relatively shallow and wide hole, then bury the bottom half in concrete. The 4x4 post bolts in to the top half. I oriented the gizmos so that the top flanges face the wind - it should help this thing work better if it's going to work at all.
My neighbor, on the lee of the fence, has WAY more land than I do. Unfair! The grooves in the concrete should hopefully channel rain/snow water away from the posts and help them last longer.
I'll water the ground around the brackets and leave them alone for at least three days. Hopefully the next post on the fence will be in the middle of next week and it'll show a finished fence - it's only about 20' to replace, so it won't take long.
Wednesday, March 9, 2011
Fabulous garden
We always had a garden when I was a kid, and ever since I moved out I've wanted to have one again. This is my first chance! Not in fertile Mississippi soil, with seasons I instinctively understand and plenty of rain. Nope. Out here in Nevada, in a sandpit backyard, with the wild-west weather and the short growing season.
I'm actually not complaining about the sand. My friend four blocks downhill has 12" of silt on a caliche base - she'll have deep sucking mudpuddles til May. At least I've got well-drained sand, enriched with a little humus, and I do own a very large hair and manure producing machine. Sand + compost = great dirt!

I started seriously trying to figure out how to garden when we bought the house last August. I've been googling off and on ever since then, trying to figure out when you plant stuff here. Last night, I finally found it! If you are trying to garden in the Reno / Tahoe area of Nevada, here's the pdf you've been looking for: UNR's "Getting Started with a Vegetable Garden." (Theoretically) reliable frost-free dates! Growing season! When to plant what stuff!!
I was so excited to find that - and realize that I wasn't actually too late - that I ran out and built my first raised bed. Well, I might not have been quite so excited if it wasn't such a lovely day - it got into the 60s, my lovely sand has dried out, and it's light til almost 6 now.
Behold!
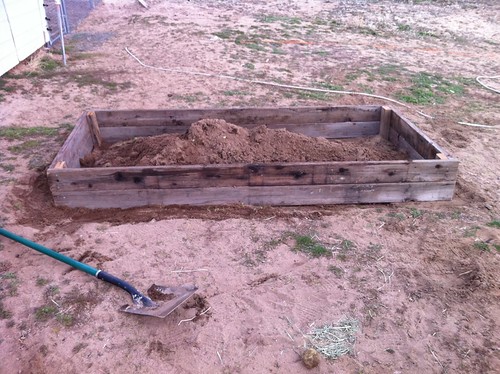
I've spent six months dithering about what to make the walls of the beds out of. I've priced out fir, redwood, railroad ties, and cinderblocks. I've agonized over sizing and height. And today I just went and raided the woodpile behind the barn and knocked together the biggest thing I could build.
They're 2x6" cedar boards that spent who knows how many years behind the barn. They used to be a deck - there's some paint and stain still visible on them, and the ends of the boards have nail holes. But they haven't quite given their all yet, and I think they should gracefully retire as garden beds. I screwed them to some 3x4" pallet boards that were also in the pile, and I leveled the bed. It's built into a slight slope. I cut the pallet boards with legs that extend about 6 more inches into the ground.
I wanted beds that were 3-4' wide, and the most efficient use of my boards turned out to be 43". I kind of wish I could've built real raised beds, maybe 2' off the ground, but this will do. I've got enough 2x6's to make one more bed, then I've got enough 3"x4" pallet boards to make one even shorter bed. I've also got a bunch of 1x12" shelving boards, but I don't know how long a 3/4" thick board will last. And I think three beds will be enough for my first year gardening. :)
Questions!
Is there an efficient way to mix compost with existing sand? Should I shovel out all the sand and then layer compost-sand-compost-sand and fork it all together, or is there a better way?
Has anybody tried that Square Foot Gardening thing? It seems really well suited to my situation - tiny beds, lots of soil amendment, irrigation is essential.
What should I plant? I know I want to put in a permanent herb garden - that's one reason I want three beds. Of course I will try tomatoes, but they're hard to grow out here. I must grow carrots to feed to the horse that provides the manure. I'm not going to try corn - not enough space, and I think the wind would demolish it. Definitely bush beans. Definitely squash and zucchini. Definitely radishes and baby lettuce. Maybe turnips. Maybe broccoli and cabbage, but I know they're all brassicas and I have to rotate them carefully.
If I manage to grow tomatoes, and the devil tomatoworms find me, I am going to make my friend come kill them. Tomato worms give me the heebie jeebies like nothing else. Maybe I will catch a chicken and make the chicken eat the worm.
I'm actually not complaining about the sand. My friend four blocks downhill has 12" of silt on a caliche base - she'll have deep sucking mudpuddles til May. At least I've got well-drained sand, enriched with a little humus, and I do own a very large hair and manure producing machine. Sand + compost = great dirt!
I started seriously trying to figure out how to garden when we bought the house last August. I've been googling off and on ever since then, trying to figure out when you plant stuff here. Last night, I finally found it! If you are trying to garden in the Reno / Tahoe area of Nevada, here's the pdf you've been looking for: UNR's "Getting Started with a Vegetable Garden." (Theoretically) reliable frost-free dates! Growing season! When to plant what stuff!!
I was so excited to find that - and realize that I wasn't actually too late - that I ran out and built my first raised bed. Well, I might not have been quite so excited if it wasn't such a lovely day - it got into the 60s, my lovely sand has dried out, and it's light til almost 6 now.
Behold!
I've spent six months dithering about what to make the walls of the beds out of. I've priced out fir, redwood, railroad ties, and cinderblocks. I've agonized over sizing and height. And today I just went and raided the woodpile behind the barn and knocked together the biggest thing I could build.
They're 2x6" cedar boards that spent who knows how many years behind the barn. They used to be a deck - there's some paint and stain still visible on them, and the ends of the boards have nail holes. But they haven't quite given their all yet, and I think they should gracefully retire as garden beds. I screwed them to some 3x4" pallet boards that were also in the pile, and I leveled the bed. It's built into a slight slope. I cut the pallet boards with legs that extend about 6 more inches into the ground.
I wanted beds that were 3-4' wide, and the most efficient use of my boards turned out to be 43". I kind of wish I could've built real raised beds, maybe 2' off the ground, but this will do. I've got enough 2x6's to make one more bed, then I've got enough 3"x4" pallet boards to make one even shorter bed. I've also got a bunch of 1x12" shelving boards, but I don't know how long a 3/4" thick board will last. And I think three beds will be enough for my first year gardening. :)
Questions!
Is there an efficient way to mix compost with existing sand? Should I shovel out all the sand and then layer compost-sand-compost-sand and fork it all together, or is there a better way?
Has anybody tried that Square Foot Gardening thing? It seems really well suited to my situation - tiny beds, lots of soil amendment, irrigation is essential.
What should I plant? I know I want to put in a permanent herb garden - that's one reason I want three beds. Of course I will try tomatoes, but they're hard to grow out here. I must grow carrots to feed to the horse that provides the manure. I'm not going to try corn - not enough space, and I think the wind would demolish it. Definitely bush beans. Definitely squash and zucchini. Definitely radishes and baby lettuce. Maybe turnips. Maybe broccoli and cabbage, but I know they're all brassicas and I have to rotate them carefully.
If I manage to grow tomatoes, and the devil tomatoworms find me, I am going to make my friend come kill them. Tomato worms give me the heebie jeebies like nothing else. Maybe I will catch a chicken and make the chicken eat the worm.
Sometimes I just patch things
I try to only talk about the beautiful yet affordable projects I undertake, because it's much nicer to pretend that any house issue can be fixed with a coat of paint and some clever trim. But some problems are larger, and of course things break with no regard to timing.
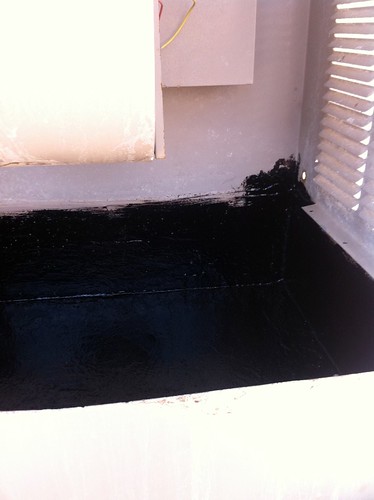
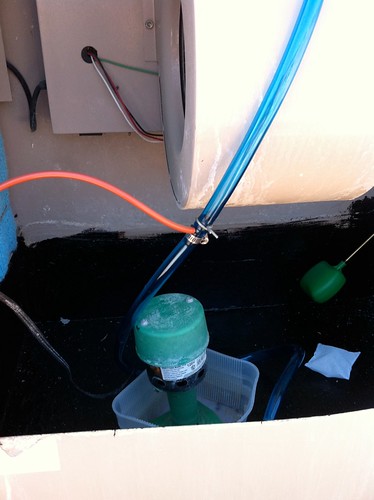
We've got aslimy cesspool broken above-ground swimming pool in the backyard. A couple days after we closed on the house, we plugged the filter unit in and the magic blue smoke came out and the filter was no more. We decided not to replace the filter - above-ground pools have a finite life and don't really add to the value of the house. And we're on a well. In the desert. It's kinda dumb.
Anyway, everything else was breaking or malfunctioning and I didn't get the damn thing totally drained before winter, so now it really is a slimy cesspool. Homeowners' insurance requires that ourattractive nuisance swimming pool be fenced off with locked gates. We scrambled to get the backyard technically "fenced" - please enjoy this shot of a chain link fence ziptied to the existing fence to cover a random hole.
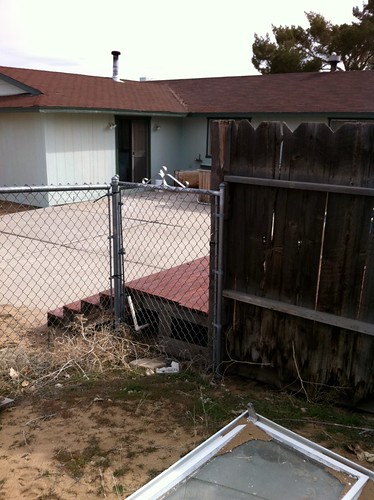
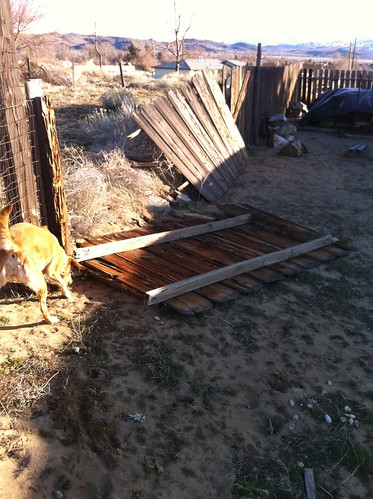
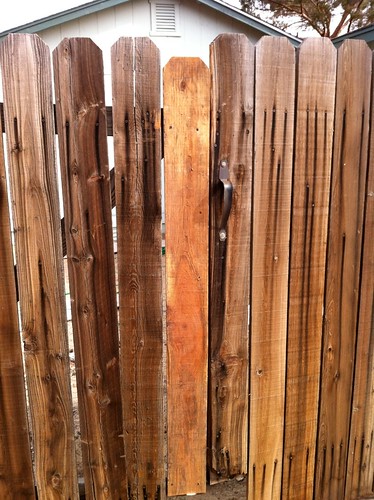
Classy, I know. Anyway. The double gates by the garage broke in the last windstorm. So did about 18' of the fence on the woodpile side of the house. The whole privacy fence is pretty precarious, and the gate latch board broke. The fence on the woodpile side had a dry-rotted post that gave up the ghost in a blizzard a couple weeks back - I watched it slowly creak sideways in the wind. Poor fence!
I measured for the woodpile fence, then went around and checked the gates. I only needed one 1-by plank to fix the gate, so I checked the barn and lucked out!
Here's the repaired re-locked gate. You can see that I didn't even bother to rehang the handle - it's got a latch on the other side and a lock on the latch and that's good enough.
Yes, the replacement board is too short. It gaps at the top and bottom. It's hard to care, when the tops of the two gates lean against each other because of this:
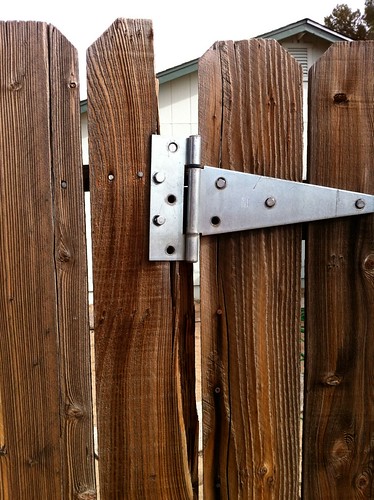
The board and backing post are split and there's like one carriage bolt holding the top hinge on. It's really hard to care about this - there is NO easy fix. All the boards are incredibly dried out and split from the weather, we don't use the gate, and we only need the fence to be there to keep the insurance company from freaking out and dropping us. As soon as I finish draining the pool I can trash the liner, recycle the aluminum, and get it off our insurance.
We're tossing around a bunch of ideas for what to do with the space when the pool is gone. It'll be some kind of outdoor lounging and/or cooking area - maybe a chiminea, maybe just the grill and some chairs?
Until then, well, it's locked away from suicidal neighborhood children.
We've got a
Anyway, everything else was breaking or malfunctioning and I didn't get the damn thing totally drained before winter, so now it really is a slimy cesspool. Homeowners' insurance requires that our
Classy, I know. Anyway. The double gates by the garage broke in the last windstorm. So did about 18' of the fence on the woodpile side of the house. The whole privacy fence is pretty precarious, and the gate latch board broke. The fence on the woodpile side had a dry-rotted post that gave up the ghost in a blizzard a couple weeks back - I watched it slowly creak sideways in the wind. Poor fence!
I measured for the woodpile fence, then went around and checked the gates. I only needed one 1-by plank to fix the gate, so I checked the barn and lucked out!
Here's the repaired re-locked gate. You can see that I didn't even bother to rehang the handle - it's got a latch on the other side and a lock on the latch and that's good enough.
Yes, the replacement board is too short. It gaps at the top and bottom. It's hard to care, when the tops of the two gates lean against each other because of this:
The board and backing post are split and there's like one carriage bolt holding the top hinge on. It's really hard to care about this - there is NO easy fix. All the boards are incredibly dried out and split from the weather, we don't use the gate, and we only need the fence to be there to keep the insurance company from freaking out and dropping us. As soon as I finish draining the pool I can trash the liner, recycle the aluminum, and get it off our insurance.
We're tossing around a bunch of ideas for what to do with the space when the pool is gone. It'll be some kind of outdoor lounging and/or cooking area - maybe a chiminea, maybe just the grill and some chairs?
Until then, well, it's locked away from suicidal neighborhood children.
Saturday, February 26, 2011
From zero to hero
Here's the awful bathroom when we moved in:
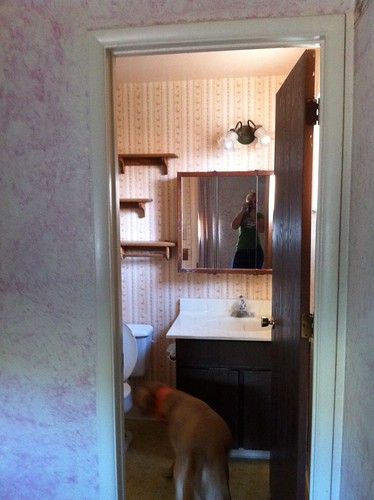
Busy floral wallpaper. Ceiling and door trim painted pink to match the wallpaper. Wooden shelves, one towel rack, very dark vanity and door. The tub and sink are inoffensive beige cultured marble, and the floor has the original yellow linoleum.
(You can also see the awful hot pink and white crackle finish in the bedroom - I got that fixed before we even moved in.)
I hated the bathroom, but set it as a pretty low priority. When I painted the front room, I ended up with almost a gallon of yellow paint left over, and I started thinking about painting the bathroom yellow. I decided a tiny bright yellow room would actually look pretty good with our existing bathroom furnishings.
I should be finishing the hall, because it is a sign of good moral character to promptly finish what you start, plus it gets depressing when you demolish too many rooms in a house at once. But you know what? With G in SF, there's no responsible adult here to tell me what to do! Hahahahah! Last week I started peeling wallpaper.
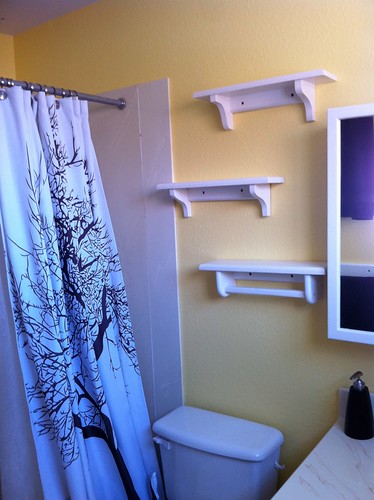
I got all the wallpaper off and scrubbed the glue off of the walls without damaging them too badly. One of the seams near the shower had peeled, and those cretins had glued it back down with Elmer's glue. I carefully cut the Elmer's off the wall - took a little of the sheetrock paper with it - then figured out how to match the texture. I sanded and primed all of the wooden fixtures and the walls, then painted the walls yellow and all the wooden trim white. Painting the wooden shelves took for-freakin-ever, but I didn't want to buy more and I thought they'd break up the yellow and look cute white.
Today I got everything put back together.
Here's the little white shelves and our awesome shower curtain:
White vanity, 33-year-old lino:

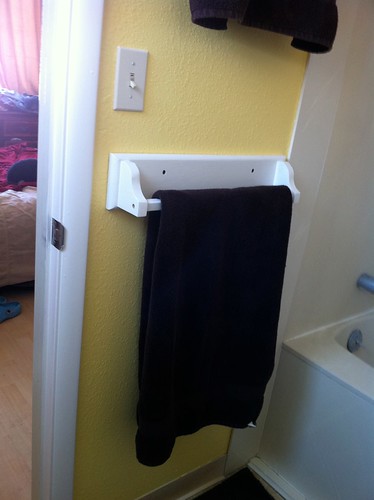
Towel racks:
I have the wooden plugs that cover the screw holes, but I think I'm just going to caulk the holes and touch up the paint there. The little wooden plugs are gonna be a horrible PITA to paint, and I'm ok with just covering the holes.
I also need to finish the door. I yanked a bunch of doors off their hinges and leaned them against various walls and they're half-primed. I am really tired of not having any doors anywhere, so maybe I'll work on doors tomorrow. They're very hurry-up-and-wait tedious.
Ok, is there anything you'd like to hear more about from the bathroom? I can go into my usual great amounts of detail about how I peeled the wallpaper and prepped the walls, matched the texture of the sheetrock, or painted the walls and/or the trim.
I am really awful about shopping for accessories. I feel like I should acquire some complementary knickknack things for those shelves but I have no idea what. I am going to look for a chocolate-brown hand towel on Amazon, though.
Busy floral wallpaper. Ceiling and door trim painted pink to match the wallpaper. Wooden shelves, one towel rack, very dark vanity and door. The tub and sink are inoffensive beige cultured marble, and the floor has the original yellow linoleum.
(You can also see the awful hot pink and white crackle finish in the bedroom - I got that fixed before we even moved in.)
I hated the bathroom, but set it as a pretty low priority. When I painted the front room, I ended up with almost a gallon of yellow paint left over, and I started thinking about painting the bathroom yellow. I decided a tiny bright yellow room would actually look pretty good with our existing bathroom furnishings.
I should be finishing the hall, because it is a sign of good moral character to promptly finish what you start, plus it gets depressing when you demolish too many rooms in a house at once. But you know what? With G in SF, there's no responsible adult here to tell me what to do! Hahahahah! Last week I started peeling wallpaper.
I got all the wallpaper off and scrubbed the glue off of the walls without damaging them too badly. One of the seams near the shower had peeled, and those cretins had glued it back down with Elmer's glue. I carefully cut the Elmer's off the wall - took a little of the sheetrock paper with it - then figured out how to match the texture. I sanded and primed all of the wooden fixtures and the walls, then painted the walls yellow and all the wooden trim white. Painting the wooden shelves took for-freakin-ever, but I didn't want to buy more and I thought they'd break up the yellow and look cute white.
Today I got everything put back together.
Here's the little white shelves and our awesome shower curtain:
White vanity, 33-year-old lino:
Towel racks:
I have the wooden plugs that cover the screw holes, but I think I'm just going to caulk the holes and touch up the paint there. The little wooden plugs are gonna be a horrible PITA to paint, and I'm ok with just covering the holes.
I also need to finish the door. I yanked a bunch of doors off their hinges and leaned them against various walls and they're half-primed. I am really tired of not having any doors anywhere, so maybe I'll work on doors tomorrow. They're very hurry-up-and-wait tedious.
Ok, is there anything you'd like to hear more about from the bathroom? I can go into my usual great amounts of detail about how I peeled the wallpaper and prepped the walls, matched the texture of the sheetrock, or painted the walls and/or the trim.
I am really awful about shopping for accessories. I feel like I should acquire some complementary knickknack things for those shelves but I have no idea what. I am going to look for a chocolate-brown hand towel on Amazon, though.
Thursday, February 17, 2011
Dithering
Obviously, I've slowed down on the hall project. I keep dithering about what piece to tackle next - I'm trying to maximize my time and use of consumable materials and I'm wasting more time that I'd potentially save. I thought I'd write up a rough post about where I can go next, so you can see my thought process.
The hall floor needs an annoying bit of detail work. I need to finish the linen closet, rip some boards for the back of the coat closet, and cut tiny little nubs of hardwood and glue them in place under the door trim. (Once I get around to it, I'll take pics, so this will eventually make sense.) This requires getting in the garage.
(Getting in the garage: I have to figure out what's wrong with the light in the garage - is it too cold, is the ballast shot, or does it just need new bulbs? It's too cold to just leave the garage door open - my well pressure tank lives in the garage, and I don't want to freeze my pipes yet again.)
The baseboard and quarter round need to go up. The quarter round needs priming, but I can do that before or after I nail it up. Cutting the trim requires getting in the garage. Priming the QR is unbelievably tedious with a brush, but it'd be a piece of cake if I had a roller already handy.
Many doors need priming, then painting. I'll roll them with primer, then brush it out to get the nice brush marks. I just need a place to work on them - I was thinking of doing them in the garage in our balmy spring weather, but balmy spring has deserted us and roaring winter is back. Too cold. I can clean out one of the spare bedrooms. If I do the doors before the trim, I can prime that QR at that point. I will run out of primer and trim paint soon, so I need paint.
I need to paint the hall walls again - I only put one coat on them before, and all the construction has left lots of smudges. I don't have enough paint though. Need more paint.
I finally took down the dysfunctional smoke detector in the hall - but it's hard-wired. I could cap it or just replace it with another AC smoke detector. Ordered one from Amazon yesterday.
I have decided I deserve better caulk so I'm going to get 2 tubes of White Lightning.
I think I have four options: floor, walls, trim, doors. What I should do is finish the floor, then trim, then get paint and do the walls, doors, and finish trim painting. But I'm about to get snowed in - not so I can't get out, but to the point where it would be prudent to not go out unless I must. So I think I'll figure out the garage light, then go buy paint and caulk, then come home and make the best of it.

edit: I'm not going anywhere, because the damn truck is dead. Let's see what heroic measures the warranty covers this time...
Wednesday, February 16, 2011
Don't buy DAP caulk!
It's like I live to torpedo any chance I may ever have of becoming a highly paid sellout blogger. I cuss a lot and post intermittently and rant against products I hate.
I'm caulking the door trim and I was overwhelmed by the irresistible urge to come tell you how awful DAP caulk is. You probably don't even realize it's awful because it's everywhere and it's often the only choice, but there are much better caulk products out there. I checked a bunch of places in Reno and got frustrated and bought like 5 tubes of DAP, then I found White Lightning at the Lowe's on Kietzke.
White Lightning makes a lot of good products. The Window and Door is probably good, the 3006 is good, and the Painter's Preferred is good. Sherwin Williams in Memphis had something else that was really good - I can't remember what it was called. SW's in Reno do not. Just fucking DAP.
Good caulk in a good caulk gun will not fall out of the crack you're caulking. It will not keep oozing out of the gun when you set it down. It's stiffer and not as slimy and it's much much easier to work with. Find better caulk and your life will be so much easier. I can't tell you how tempted I am to throw the last tube and a half away and go buy some damn White Lightning.
Friday, February 11, 2011
Nine doors
This stupid hallway. It has nine doorways and eight doors. (There's no door to the laundry room - previous owners took it down and I'm not missing it.) Anyway, that means nine doorways to trim, nine doorways to caulk and fill, nine doorways to cut in around, nine doorways to paint, and eight doors to paint. I got the door trim up today. I should take pics so you can see how crappy it looks before I putty and caulk it. I used all the MDF trim and most of the oak trim - had to piece two doorways together, but I think they'll work.
Friday, February 4, 2011
The hall flooring is done*
*Ok I'm really splitting hairs here - the hall is done but the linen closet is not done yet. I just flat ran out of time today. Had a bunch of other chores to do, and I multitasked like a pro but didn't have time to go back to that closet yet.
I'm really happy. I put the old aluminum thresholds back down, and as ugly as they are they made a huge difference. If you look at the floor only, it looks like a real room, not a construction site. And I got all the wood out of the bedroom! I think the hall is going to look really, really sharp when it's done - and it definitely feels like the end is in sight now.
I know I'm just amped because I got the scariest part of the project done. I think I mentioned I've never actually laid a whole room of hardwood before? I've refinished it, and I've repaired it, which is trickier in some ways, but I've never done a 16' run of it. The boards at the end, by the cat room (the room with the piles of wood still present) are off by maybe 1/4". I'm very satisfied with that. I feel confident that I could lay hardwood in any room in this house, and I'm officially on the lookout for small lots of utility grade stuff on Craigslist.
Next up: trim. Next week I'll roll the walls twice, then put up all the door trim. Then I'll lay baseboard til I run out, then buy enough to finish and buy the quarter-round... although I might change that plan and tack the QR to the baseboard before I put it up. I've got the standard 3/4" expansion gaps at the sides of the wood, and it'll be a bitch to keep the baseboard from falling down in the gap. If the QR was tacked to it, it wouldn't fall down in the gap.
Once I get the trim up, I can clear out one of the spare bedrooms and set it up to paint doors. I have those cheap new doors in the garage, but I'm actually really happy with the way the current doors look painted white. The dark woodgrain stuff looks surprisingly good with white semi-gloss. They'll all need trimming - the hardwood is a bit higher than the old carpet and laminate, so they'll drag or not shut right.
I like to paint doors standing up. A lot of sites recommend laying them on sawhorses and painting them flat, to avoid runs, but if your paint is running you're doing it wrong. Painting a door that's standing up is easier IMO than bending over to paint one that's horizontal. You can lean a lot more doors against walls than you can put them on sawhorses, and you can carefully flip them before the paint is cured - you can't do that if you're laying them flat.
There's still a lot of work to do, but it's really shaping up nicely.
Hall floor is finished from Funder on Vimeo.
Tuesday, February 1, 2011
No measuring
Today I got half of the "short" side of the hall laid.

It's taking longer than the "long" side because there's much more cutting involved. Tomorrow the trimmer is coming to give Dixie a pedicure, then I need to go to the grocery store, so I might not get finished with the floor til Thursday.
I'm not as wiped-out tired tonight, so I thought I'd write about how to cut without measuring. This is a pretty common trick, so you might already know it - but if not, it's a lifesaver.
Let's say you need to cut a rectangular piece of flooring into an L-shape, to fit around a door jamb.
First, slide the flooring up against the door jamb and make a mark. This shows you how wide the L piece is going to be.

Next, hold the flooring up so it butts* into the corner / the next piece of wood - it won't lay down on the floor because the door trim is in the way, but you don't need it to. Make a mark here - this will show you how long the L will be.

Use a speed square to mark straight lines. If you were careful when you lined up for the two marks, you will have a perfect cut - no measuring necessary.

I usually do the cut across the grain on the miter saw, then finish the rip cut along the grain with, sigh, my circular saw. (A table saw, a table saw, my kingdom for a table saw!) Because I've marked on the top and I'm cutting from the top, the cut piece won't quite fall out on its own. A hacksaw or a coping saw will finish the job pretty quickly.
You can do something very similar when cutting off the ends of flooring boards, too. Let's say you're working this row from left to right - you have a board or boards filling up most of the space from the left wall, and you have a little space to fill against the right wall. So the board you want to cut needs to have the RIGHT side cut off. If you flip the board 180 degrees - so the tongue is touching the tongue of the previous row - you can make a mark based off of the boards on the left you've already laid. Cut the mark, flip the board back around so the cut side is against the right wall, and you're golden. Remember when you're marking to stick a little spacer against the wall to allow for expansion.
Does that make sense? This blog is going to either drastically improve my writing or make me give up in despair. Describing home repairs is excruciatingly hard!
*Heh heh, heh heh. I said "butts." Heheh, heheh.
Monday, January 31, 2011
Not as hard as I thought
I decided to hand nail the long side of the floor. I blind-nailed it (nailing into the tongue of each board, at an angle, then setting the nail to lie flush with the tongue) and it looks really quite nice. I don't usually say this - I usually cheer everybody on to try stuff - but you can't do this if you don't nail well. If you bend a lot of nails or hit your thumb or miss a lot, this is not the technique for you. But if you can nail decently, it's not bad!
I face-nailed (nails on top of the boards, where you can see them) the first row of boards, then started blind-nailing. The last row is face-nailed too. I predrilled a hole for every single nail, which makes all the difference in the world with oak. The first row I blind nailed I fucked up a lot, but once I got the hang of it I rarely wrecked a nail or banged the wood. I used 6f's (6 penny finishing nails), because they're what I could get locally - the Internet says you should use cut nails, kind of like delicate small concrete nails, but local stores don't carry them. I know that finishing nails could pull up at some point in the future, so I angled the nails in slightly different directions, for better hold.
I spent about six hours working on the floor, and got the long side of the hall and the coat closet done.
I keep thinking maybe I should've used 8's instead of 6's (8s are 2 1/2" long, 6's are 2" long), but it's such a disaster if a nail bends while you're driving it. Really hard to pull it without denting the board. And 8's bend so much easier than 6's... I think it'll be ok.
I have some pictures and video, but I'm too tired to care about uploading them tonight :) I love the way the floor looks and feels. It's very tight, no bounce or squeak, just that slight softness you get from walking on real wood.
Saturday, January 29, 2011
Jamb it all...
After I posted last night, I realized that yes, I did need to cut the door jambs. So I got up this morning, went to my hair appointment (I'm a lovely shade of blonde again), had lunch, dawdled home, checked my email and Facebook and craigslist like 15 times each, then woefully set to work.
I don't have a jamb saw. They're really one-trick ponies - they only cut jambs. They cut the hell out of jambs, but it's an expensive purchase for one home, even if it is The Home of Infinite Doors. My best friend back in Memphis has a jamb saw - I could find it in his toolbox blindfolded. Alas, he is 2000 miles away, so I made do.
I tried my trusty hacksaw, but it didn't work as well as I'd hoped, so I turned to the coping saw. It worked well enough, so I spent three freakin' hours cutting 18 door jambs. I got pretty disgusted a couple times and almost went to town for a Dremel, but I contained myself and got it done.
Now. Back to cutting oak.
Friday, January 28, 2011
Floor halfway laid!
I'm learning a lot. I must admit - I understand how floors work, and I've done some repairs and some click-together laminate, but I've never installed hardwood. Still, it's going exactly like I thought it would - it's easy yet tedious. Today I worked really hard, yet really inefficiently, and got almost half the hall cut to fit in place. I flopped down three rows, then double-checked the Internet Consensus. Cussed a lot. Pulled them up and flipped them around so that the tongues go out toward the part you're working on. Laid them back down. Wondered how much expansion joint to leave - looked that up (3/4" is "standard" or possibly "total overkill for a hall" - it's pretty small sq. footage, so it just can't expand like a huge room can. Cussed a lot. Banged my three rows out from the wall, wedged in some scraps of baseboard, kept cutting and dry-laying.
My hall is an L-shape - 17' x 3', then a 90 degree turn, then another 17'x3.' For reasons too tedious to type out, I picked one leg of the hall to be the "long" side, with the boards running the length of the hall. The other leg is the "short" side, with the boards running side to side. When I got the "long" part of the hall down, I realized I'd be much better off using a 3/4" joint instead of the half-inch baseboard - if I use a half-inch joint on one side, I have like an inch on the other side. Using 3/4" on both sides makes the floor come out even without ripping down 17' of flooring planks - and it always looks nicer if you can avoid splitting boards. So I whipped out the prybar and scooted the whole mess over.
I laid about 3' down the short side of the hall, then reached a doorway. I didn't want to cut to fit around the doorway until I was SURE of where the boards will be, so I thought I'd topnail the first row of boards on the long side. I'm not nailing anything until I get the whole floor mostly cut and fit, since I'm renting the nailer - I'm just too slow at this to justify spending days with a rented nailer. Anyway, I headed back up to topnail the first row and realized I really ought to lay in the doorways on the long side - the trim will cover the 3/4" gap along the walls, but I need a half-plank or so in each doorway to cover the threshold. As I feared, my little homeowner grade circular saw doesn't precisely enjoy ripping 3/4" oak, but it did the job. To get the thresholds wedged in, d'oh, I needed to scoot the whole floor up against the far wall. The prybar did the trick, but I was pretty frustrated at that point - why didn't I do the damn doorways first?
Anyway. Got the doorways in. The floorboards are pretty tight against the door jambs - I wonder if I should hacksaw the door jambs off to float just above the planks, in case of expansion? The house gets (relatively) humid in the summer from the swamp cooler - but does hardwood expand along the length a lot, or just along the width?? The internet is inconclusive, and it's something I can do later on.
I drilled and nailed the doorways and the first long run with finish nails. They're pretty unobtrusive, and the trim should almost cover them. Then. Finally! I tapped all the boards back tight and flush with the nailed-down first row, slapped up some boards in the coat closet, and called it a night.
Ta da! One closet, four doorways.

I had to take the door down to the furnace nook. It needs trimming. I hope the cats don't kill themselves or burn down the house in the furnace tonight.
Astute readers are wondering how the hell I'm going to nail the floor after it's laid. I have a complicated scheme to pull it back up and carefully stack it in the right order. I think it will work, but complicated schemes often fail. We'll see... this might end up being cheaper but much more tedious than just renting the damn nailer for two days.
I didn't use the tape measure once. If you want still more words about this, I will explain how to flip boards around to mark where to cut without measuring.
My hall is an L-shape - 17' x 3', then a 90 degree turn, then another 17'x3.' For reasons too tedious to type out, I picked one leg of the hall to be the "long" side, with the boards running the length of the hall. The other leg is the "short" side, with the boards running side to side. When I got the "long" part of the hall down, I realized I'd be much better off using a 3/4" joint instead of the half-inch baseboard - if I use a half-inch joint on one side, I have like an inch on the other side. Using 3/4" on both sides makes the floor come out even without ripping down 17' of flooring planks - and it always looks nicer if you can avoid splitting boards. So I whipped out the prybar and scooted the whole mess over.
I laid about 3' down the short side of the hall, then reached a doorway. I didn't want to cut to fit around the doorway until I was SURE of where the boards will be, so I thought I'd topnail the first row of boards on the long side. I'm not nailing anything until I get the whole floor mostly cut and fit, since I'm renting the nailer - I'm just too slow at this to justify spending days with a rented nailer. Anyway, I headed back up to topnail the first row and realized I really ought to lay in the doorways on the long side - the trim will cover the 3/4" gap along the walls, but I need a half-plank or so in each doorway to cover the threshold. As I feared, my little homeowner grade circular saw doesn't precisely enjoy ripping 3/4" oak, but it did the job. To get the thresholds wedged in, d'oh, I needed to scoot the whole floor up against the far wall. The prybar did the trick, but I was pretty frustrated at that point - why didn't I do the damn doorways first?
Anyway. Got the doorways in. The floorboards are pretty tight against the door jambs - I wonder if I should hacksaw the door jambs off to float just above the planks, in case of expansion? The house gets (relatively) humid in the summer from the swamp cooler - but does hardwood expand along the length a lot, or just along the width?? The internet is inconclusive, and it's something I can do later on.
I drilled and nailed the doorways and the first long run with finish nails. They're pretty unobtrusive, and the trim should almost cover them. Then. Finally! I tapped all the boards back tight and flush with the nailed-down first row, slapped up some boards in the coat closet, and called it a night.
Ta da! One closet, four doorways.
I had to take the door down to the furnace nook. It needs trimming. I hope the cats don't kill themselves or burn down the house in the furnace tonight.
Astute readers are wondering how the hell I'm going to nail the floor after it's laid. I have a complicated scheme to pull it back up and carefully stack it in the right order. I think it will work, but complicated schemes often fail. We'll see... this might end up being cheaper but much more tedious than just renting the damn nailer for two days.
I didn't use the tape measure once. If you want still more words about this, I will explain how to flip boards around to mark where to cut without measuring.
Thursday, January 27, 2011
Prep is always the most important step
I moved briskly along to the hall floor today. I needed to level it and put 15 lb felt paper down - after that, I can dry-lay the floor over the weekend, then rent the nailer Monday and hopefully get it done in a day.
Here's what I learned: the cheap laminate was failing because of the wonky dips in the subfloor. I'd seen one of the ridges as soon as I took up the laminate, and I've been worrying about it every time I walk down the hall for two weeks. The ridge I was looking at was a weird little hump where the hall runs into the front room, by the coat closet. I used the old beadboard to shim up the closet floor and part of the hall floor, then evened everything out with layers and layers and layers of felt paper. But that ridge turned out to be the easy one! There was another high spot in the center of the hall, headed toward the laundry room. The sides of the hall were EACH 1/4" below the middle of it for a good 5' before it evened back out.
I have been deliberately clunking down the hall and bouncing up and down on the subfloor, and nothing squeaks or bounces. That's good - it means the floor joists underneath are in good shape (just like the home inspector promised. Of course it's fine - everything that got inspected is fine, everything that isn't on a standard home inspection is wrong, fucked up, broken, or unsafe.) Now - if the floor joists are fine, what gives with the subfloor?
It's probably just age. Things warp and sag and settle into new slightly off kilter configurations from about the time the first owner moves into the house. I could shim it up and make a flat surface to nail the flooring to, or I could climb under the house and put in some bridges between the joists and jack the bridges up perfectly level and probably level the floor from below. If the joists were creaky, I would go under there and do some work. But as it is - if I go mucking around bridging the joists and jacking them up, I could cause other immediate problems, like shifting the whole house so that the doors don't shut right or the drywall cracks. I am already putting the hardwood down because I tried to fix something and made it worse, so... I just shimmed the subfloor from the top.
I filled in the big spots with the old paneling from the front room. I hadn't gotten around to sawing it into small enough pieces to hide in my trash bin, and I'm glad. (Remodeling really brings out one's hoarder tendencies. You really can reuse that junk!) The old paneling that I took down was plywood and slightly thicker, and the leftover pieces of new paneling were MDF (or maybe HDF) and slightly thinner. Here's what I did.
I got three straight level-things ready - my 24" spirit level, a piece of the hardwood flooring exactly the width of the hall, and a 6' piece of aluminum I found in the garage. (I think it was part of the closet doors we took down. See, I did need it for something!) The long piece checked the flatness of the subfloor lengthwise down the hall, the short hardwood laid on its side checked it side-to-side, and just for laughs I checked the actual level every so often.
I started at the end that was bugging me.

See how the level is sitting on the paneling in the closet, the hump in the floor, and the paneling on the floor at the right? Whole day went like that. I filled in the low spots with paneling, then layers and layers of felt paper to smooth out the transition from the paneling to the subfloor. Crawl 2 feet away, check flatness from both directions, repeat. I used five strips of staples and about 250 sq ft of felt paper (for 100 sq ft of hall!)
The cats were nuts about this crazy thing happening before their eyes. And Cersei was a little nervous, but not too bad. The main casualty was me - my back is in knots, and I'm sure my knees are bruised.
Wednesday, January 26, 2011
Finished the front room!
I took a short video in the hopes that you can see the colors and layout better that way.
Now, even though I just said it's finished, here's what's not finished: some of the switch plate covers are fancy wood guys, so I'm priming and painting them. I haven't put up the crown molding, and the ceiling could use a second coat of paint before I do. And the front door is the "original" white, not the white I'm using - but it needs some drips sanded off. I'll do that when it's warmer and I can leave the door open while it dries, maybe replace the weatherstripping at the same time.
I took a lot of pics as I worked, so I'll write up something on molding and something on painting next.
Next project: install the hardwood in the hall. I'm going to lay the underlayment and get it dry-fitted over the weekend, then rent the nailer Monday.
Finished front room from Funder on Vimeo.
Now, even though I just said it's finished, here's what's not finished: some of the switch plate covers are fancy wood guys, so I'm priming and painting them. I haven't put up the crown molding, and the ceiling could use a second coat of paint before I do. And the front door is the "original" white, not the white I'm using - but it needs some drips sanded off. I'll do that when it's warmer and I can leave the door open while it dries, maybe replace the weatherstripping at the same time.
I took a lot of pics as I worked, so I'll write up something on molding and something on painting next.
Next project: install the hardwood in the hall. I'm going to lay the underlayment and get it dry-fitted over the weekend, then rent the nailer Monday.
Thursday, January 20, 2011
More progress
Got some of the trim up in the front room today. It looks way better.
First I wanted to change out the blade on my miter saw. I love my saw - picked it up for $50 off of Craigslist. It's not a compound one, just a standard Ridgid miter saw. I forgot a crucial saw changing rule, which is that saw screws are counter-threaded - left is NOT loose. No matter how much WD-40 you put on, and how much torque you put on the wrench, left just won't loosen the nut. A frustrated Google solved that problem, and righty loosey got that nut right off. The new blade cuts that oak trim like butter. <3 a new blade.
Yesterday I'd worked out in my head the order I needed to do stuff in. It was a little backwards from normal new construction trim, but it was logical. First, door trim around the entrance to the kitchen. Put up the sides by measuring the short (inside) point, level them, then you can measure long-to-long for the top piece - it's much easier to measure and cut long-to-long than short to short.
Next, I put up the chair rail on the long wall. It's about 17', but there was just no way I could get a 17' piece of trim home, so I bought two shorter pieces. I cut the 11' piece of chair rail straight on one side (where it roughly butts up to the stone wall), and angled on the other side. Then, since I had the door trim up, I could just cut an angle on the second piece and hold it up to mark the flat cut against the door trim. It's always preferable to hold something up and get the mark that way, if you can - measuring properly then marking properly is hard for everybody.
Then I cut the two short pieces of chair rail for the walls beside the hall entrance. I cut them to length at a 90 degree angle, then set the blade at at 22 angle and nipped off just a tiny bit - it looks better than a flat cut or a 45 terminating at that outside corner. I've got some pictures of it, and I'll edit them in so you can see what I mean.
The two short pieces of chair rail needed to line up with where the old trim had been - that way the line of the chair rail all around the room will be at the same height. Once I had those pieces in place, I just laid in the 1" flat trim that goes vertically along the outside corners. Once I had THAT in, I could measure the remaining holes and cut the new wainscoting.
It's one of those (frequent) times when I wish I had a table saw. It's really hard to cut a perfectly straight line on a 4' wide piece of material with a circular saw! I flipped each piece around so that the factory edges are at the top and out sides, and the jaggedy Funder-cuts are at the bottom and in the corners. The baseboard will hide the bottoms, and a little caulk fixed the corners right up.
I chipped off one corner of one piece, but I got it glued back down. When the glue sets, I'll carefully caulk it and I think it'll look ok - it's near a corner. I also glued the join on the 17' wall, with my snazzy Gorilla Glue. There's a small seam visible, but again, I think caulk will fix it.
I got a lot of the trim caulked and most of the nails filled. The new wainscoting is glued to the walls, then held on with paneling nails I scavenged off of the old wainscoting. Paneling nails have little rings down their length, to hold better. They're just another minor expense that I thought I could avoid, and I'm glad I did. I only needed about 20 nails.
The nails on the rest of the wainscoting aren't set, they're just flush with the wall, so I left the new pieces that way too. I might set them anyway... I won't decide til I get one coat of paint on. I don't think you're supposed to set paneling nails?
Tomorrow mid-day I'm going riding with a friend, but I need to paint some more when I get back. I'll do a little more detail on trim work then too. I've got a post on painting tips mostly ready to go. It's surprisingly hard for me to write generic tips posts! They don't flow right, not like describing stuff I've done. And I constantly wrestle with not wanting to put up a huge post where you'll get bored halfway through, so I know I'm skipping over stuff here. As always, holler if you want more detail on something.
Wednesday, January 19, 2011
Slow progress
I am progressing, actually.
The hall is on hold while the wood acclimates. I got the long wall of wainscoting primed and one coat of trim paint on it. I took down two hall doors, primed them, and got a coat of trim paint on them too. Tomorrow I'll second coat all that stuff, then I can re-hang the doors and see how they wear. I actually really like the way they look painted, so I hope they don't chip and look shitty :(
I took down the two small piece of wainscoting. Yep, they were nailed AND glued to the wall, so it's really spectacularly ugly right now - bits of Liquid Nails, s-shaped rips in the pink sheetrock, different texture... ugh. Today I've been thinking about how to deal with some trim issues.
I am not sure if this is good descriptive writing. One of the reasons there are so many "secrets" to home improvement is that it's amazingly hard to describe a problem or a solution without pictures, and before camera phones that was just not feasible. I've taken some pictures, and I can take more or just try to clarify what I'm talking about. So if reading this makes you go "huh?", let me know!
I'm gonna use this term a lot, so I'm gonna take the time to explain it. There's two kinds of corners in a room - inside and outside. Inside corners are the four corners of your standard box-shaped room. Outside corners, counterintuitively, poke IN to a room. If you have a doorway that doesn't have a door in it - just a drywalled opening - then those are outside corners.
First, the wainscoting terminates at each doorway. I am going to trim the doorway to the kitchen, because it'll look ok with trim and it's much, much simpler that way. But the "doorway" to the hall is actually just an opening that goes to the ceiling. Since matching the fake stucco drywall texture is off the table, (glares at jenj) I want to put up replacement wainscoting. The previous stuff was "framed" with reversed door trim, which meant the plywood edge of the wainscoting didn't show where it ends at the outside corner to the hall. I am using chair rail for the top line and baseboard for the bottom line of the wainscoting, but I needed something to cover those outside corners to the hall. I poked around Home Depot and decided that a piece of flat 1" trim won't look too bad - it's got one sharp edge, which I will butt up against the new wainscoting, and one slightly rounded edge, which will line up with the outside corners.
This is the reason why I had to buy a sheet of new wainscoting, by the way. The new trim is narrower than the door trim, and the current wainscoting wouldn't cover.
My second problem is much more daunting (but easier to ignore!) If you've never seen it installed right, or looked closely at crown molding, you might not realize that it sits at a 45 degree angle between the wall and ceiling. It actually touches both the wall and the ceiling - there's a triangular gap behind the piece of molding you see up there. The idiot previous owners "trimmed" the walls with door trim attached to the walls, touching the ceiling. It didn't make that 45 degree bend and attach to the ceiling too. (Well, it couldn't - real crown is beveled on the backside to fit snugly against the wall and ceiling at the same time.) I pulled that crap down, so there's a 2.5" wide pink band around the top of the whole room. Miraculously, the "stucco" goes all the way up to the ceiling, but it's all chipped and there's cracks at the ceiling line and it looks gross. And it's a big room, so it would actually look quite nice with crown molding.
Here's the problem: I have to figure out how to terminate the crown at an outside corner. Remember how I said there's a triangular gap behind each piece of proper crown? I've got to cover that up! It's pretty easy to terminate to an inside corner - Home Depot even has little decorative bits to make it look snazzy - but not so easy to terminate an outside corner. I don't want to run crown down the whole hall; I don't think it would look very good and that stuff's not cheap. If I don't figure it out before I get to the crown, I will probably run it along two walls and leave it for later.
I've found some decent tutorials for how to terminate the crown there. It may be beyond my capabilities, but they're short runs so it's worth trying.
Saturday, January 15, 2011
Colors
After a really frustrating morning googling for 70s fieldstone walls that don't look hideous, I think we're leaning towards yellow.

I cropped the right side of the room because the enormous blue recliner stands out so much it's hard to judge the other room elements. The curtains are chocolate and off-white - if the yellow doesn't clash with them, they will be a great accent for the giant stone wall.
I need to pick up a lot of light and medium yellow swatches and try them out.
The enormous blue recliner will either live in a spare room or make its debut on craigslist.
Any suggestions?
Friday, January 14, 2011
Cheap hardwood
So I fucked up the hall. The best way I've found to deal with fucking something up is to sulk for no more than three days, then move along. I hated that floor anyway, so we've decided to replace it. With hardwood. Cheap hardwood. The good stuff starts at $5/sq ft, and sure it looks really nice, but it's a hall. I was not thrilled about the thought of spending more than $500 to have a floor in the hall.
I did a lot of looking online and in town, and I found medium brown utility grade 3" wide solid oak for under $2/sq ft. It's a shade darker than I would have chosen in a perfect lottery-winner world, but I actually really like the utility grade stuff. Utility/cabin grade means it's got knots, wormholes, and occasional damage to the structural tongue-and-groove parts. You buy a little extra to make sure you have enough. The floor doesn't look mirror-smooth and perfect when it's finished, but that's not really appealing to me anyway. It's a hall. The dog is going to track in sand, I'm only going to sweep once a day, and honestly? I'm not going to remember to take my shoes off every single time I come through there either. It's gonna get banged up. Pre-banged-up is just fine with me.
I picked up five boxes (105 sq ft) today, but I think I'm going to go back for another box tomorrow or Monday. The actual hall dimension is 90 sq ft, so 105 is perfect - but, er, there's two tiny closets I forgot about. And the previous owners forgot about - the original 30 yo extremely horrible blue carpet is still in place in them. If I buy one more box of wood, I'll have plenty to do the closets too.

Advice online says to let your wood acclimate to your house's temperature and humidity for a week. The guy at the flooring store recommended 2-3 weeks - eeek! I'm sure he's right, as much as I hate to wait now that I have exciting new flooring. There's like no humidity at all in Reno, so the wood will shrink as it loses moisture. I'd really, really hate to lay the floor, nail it down, then have it shrink up and get big cracks in it. So I'll wait.
I locked the cats in the bedroom while I pulled up the laminate and stacked the boxes of hardwood in the hall. When I let them out, it was a Brave New World, one which they'd never seen before in their whole lives.
Subscribe to:
Posts (Atom)